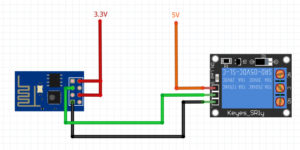
ESP8266 ESP-01 Blynk Virtual port Relay
/**************************************************************
* Blynk is a platform with iOS and Android apps to control
* Arduino, Raspberry Pi and the likes over the Internet.
* You can easily build graphic interfaces for all your
* projects by simply dragging and dropping widgets.
*
* Downloads, docs, tutorials: http://www.blynk.cc
* Sketch generator: http://examples.blynk.cc
* Blynk community: http://community.blynk.cc
* Social networks: http://www.fb.com/blynkapp
* http://twitter.com/blynk_app
*
* Blynk library is licensed under MIT license
* This example code is in public domain.
*
**************************************************************
* This example runs directly on ESP8266 chip.
*
* Note: This requires ESP8266 support package:
* https://github.com/esp8266/Arduino
*
* Please be sure to select the right ESP8266 module
* in the Tools -> Board menu!
*
* Change WiFi ssid, pass, and Blynk auth token to run 🙂
*
**************************************************************/
#define BLYNK_PRINT Serial // Comment this out to disable prints and save space
#include <ESP8266WiFi.h>
#include <BlynkSimpleEsp8266.h>
// You should get Auth Token in the Blynk App.
// Go to the Project Settings (nut icon).
char auth[] = “xxxxxxxxxxxxxxxxxxxxxxxxxx”;
// Your WiFi credentials.
// Set password to “” for open networks.
char ssid[] = “yyyyyyyyyyyyyyy”;
char pass[] = “zzzzzzzzzz”;
void setup()
{
Serial.begin(9600);
pinMode(0, OUTPUT);
pinMode(2, OUTPUT);
Blynk.begin(auth, ssid, pass);
}
BLYNK_WRITE(V1)
{
int i=param.asInt();
if (i==1)
{
delay(300);
digitalWrite(0, HIGH);
digitalWrite(2, HIGH);
delay(1750); // delay 1000 = 1 sec
digitalWrite(0, LOW);
digitalWrite(2, LOW);
}
else
{
digitalWrite(0, LOW);
digitalWrite(2, LOW);
}
}
void loop()
{
Blynk.run();
}
credit:http://docs.blynk.cc/#blynk-main-operations-get-data-from-hardware
https://community.blynk.cc/t/blynk-virtual-pin-blynk-write/7001/3

