Raspberry PI Zero W install OS ,MQTT without keyboard, monitor

Setup Wifi

create wpa_supplicant.conf

country=TH
ctrl_interface=DIR=/var/run/wpa_supplicant GROUP=netdev
update_config=1
network={
ssid=”your-networks-SSID”
psk=”your-networks-password”
}

save and copy to root or sd drive:\

Enable ssh

create ssh.txt

save and copy to root or sd drive:\

reset default user password (user:pi password:raspberry)

create userconf.txt

pi:$6$c70VpvPsVNCG0YR5$l5vWWLsLko9Kj65gcQ8qvMkuOoRkEagI90qi3F/Y7rm8eNYZHW8CY6BOIKwMH7a3YYzZYL90zf304cAHLFaZE0

save and copy to root or sd drive:\

การ Fix ip address

sudo nano /etc/dhcpcd.conf

กรณี Wireless เพิ่มไปตรงท้ายบรรทัด

interface wlan0

static ip_address=192.168.1.10/24
static routers=192.168.1.1
static domain_name_servers=192.168.1.1

กรณีเป็น LAN

interface eth0 เพิ่มไปตรงท้ายบรรทัด

static ip_address=192.168.1.10/24
static routers=192.168.1.1
static domain_name_servers=192.168.1.1

การติดตั้ง MQTT MOSQUITTO

sudo apt-get update
sudo apt-get upgrade

sudo apt-get install mosquitto mosquitto-clients

การสร้าง user แบบคนเดียว หรือหลายคน

sudo nano mosquitto_pwd.txt

aaa:aaaa*123456 // mqtt user1 password

bbb:bbb*123456 // mqtt user2 password

save แล้ว เข้ารหัส encrypt file โดยคำสั่ง

sudo mosquitto_passwd -U mosquitto_pwd.txt

การเพิ่ม password file ,config ไปยัง mosquitto

sudo nano /etc/mosquitto/mosquitto.conf

persistence true

allow_anonymous true
password_file /etc/mosquitto/mosquitto_pwd.txt

listener 1883

protocol mqtt

ตรวจสอบ service
sudo /usr/sbin/mosquitto -c /etc/mosquitto/mosquitto.conf
หรือ
sudo service mosquitto status

หรือ ps ax | grep mosq

การสั่ง Restart Service

sudo service mosquitto restart

ดูว่า port ใช้งานได้ไหม

netstat -tlnp | grep mosq

sudo mosquitto -v

การดู view all topics

mosquitto_sub -h localhost -u user -P password -t # -d

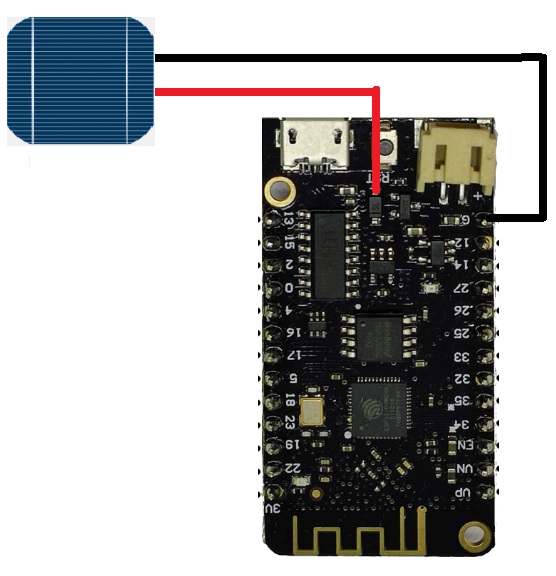
ESP32 Lolin32 Lite Solar Cell

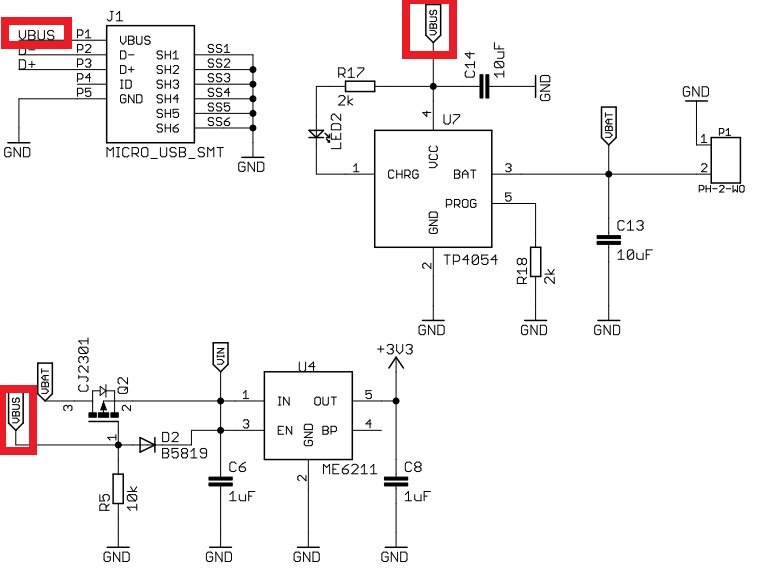
ME6211 High Speed LDO Regulators, High PSRR, Low noise
Max Input Voltage 6.5v
Max Output Current 500mA
Output Voltage 3.3v

TP4054 Standalone Linear Li-lon Battery Charger with Thermal
Regulation in SOT
Input Supply Voltage 0.3-10v
Batt 0.3-7v

Solar Cell panel 5.5v-6v

ESPEasy ESP32 Lolin32 Lite DS18B20

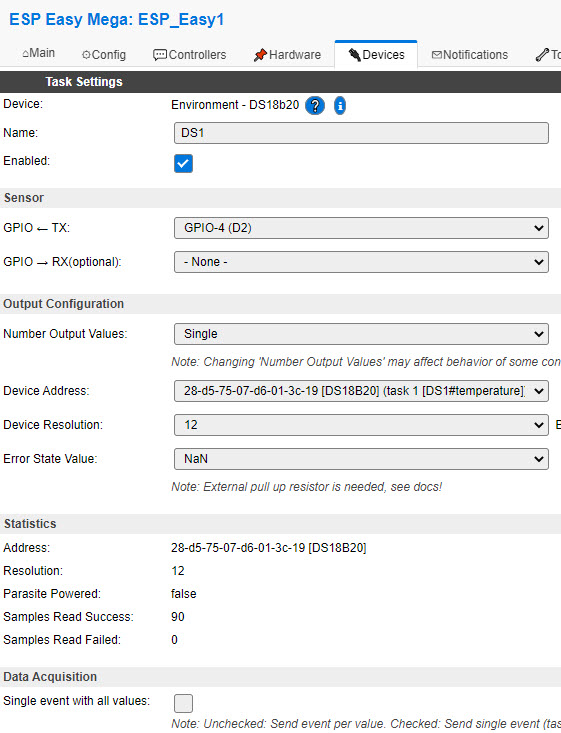
ต้องไปกำหนดค่าขา GPIO เป็น Input Pull UP

เมื่อตั้งค่า Sensor  GPIO <- TX ถูกต้องแล้ว

ให้ดู log ว่าแสดง DS: อะไรหรือไม่

ที่พบคือเมื่อต่อขาถูกต้องแล้ว Enable พบว่าแสดงเป็น

DS : Cannot set Resloution 

และ Device Address ไม่แสดงอะไร

ผมลองปรับ Device Resolution bit ไปที่ 12 แล้ว submit

พบว่า Device Address  แสดง Address ออกมา เมื่อเลือกแล้ว submit จะแสดงอุณหภูมิออกมาได้


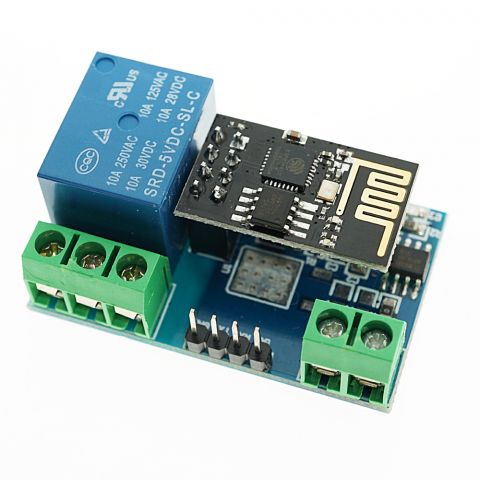
ESPHOME ESP-01 Relay board

esphome:
  name: esp-01-relay-3

esp8266:
  board: esp01_1m

# Enable logging
logger:

# Enable Home Assistant API
api:

ota:
  password: “97e03zzzzzzzzzzzzzzzzzzzz”

wifi:
  ssid: Your SSID
  password: Your PAssword

  manual_ip:
    static_ip: 192.168.1.100
    gateway: 192.168.1.1
    subnet: 255.255.255.0
    dns1: 192.168.1.1
    dns2: 8.8.8.8
  # Enable fallback hotspot (captive portal) in case wifi connection fails
  ap:
    ssid: “Esp-01-Relay-3 Fallback Hotspot”
    password: “0fjsyyyyyy”

captive_portal:
switch:
  – platform: gpio
    pin: GPIO0
    name: “Relay Switch 10A”
   

ใช้งานLocal Home Assistant ร่วมกับ Google Home

  1. ติดตั้ง add-on ngrok และเริ่มต้นสร้าง tunnel เข้ามาที่ Home Assistant
  2. Integrate Google Home กับ Home Assistant
  3. ตั้งค่าให้อุปกรณ์ Google Home เชื่อมต่อกับ Home Assistant

ติดตั้ง add-on ngrok และเริ่มต้นสร้าง tunnel เข้ามาที่ Home Assistant

  • cofiiguration
  • Add-ons,Backups & Supervisor
  • ADD-ON STORE
  • มองหา ngtok Client  แล้ว Install 
  • หลังติดไปไปที่ www.ngrok.com เข้าไป sign-up ลงทะเบียน
  • จากนั้น login เข้าไป ดูที่ Getting Started
  • เลือก Your Authtoken
  • จะมี Token ให้ คัดลอกมา
  • กลับมาที่ ngrok Client เลือกเมนูบน  Configuration
  • ที่ Option ให้วางค่า token ที่ได้หน้า auth_token:
				
					log_level: info
auth_token: 27XXXXXXXXXXXXXXXXXXXXXXXXXXXXXXX
region: us
tunnels:
  - name: hass
    proto: http
    addr: 8123
    inspect: false
    bind_tls: true
				
			
  • จากนั้น SAVE และ RESTART
  • กด menu บน Info เลือก Open WEBUI
  • จะได้ค่า Tunnel URLs คัดลอกมา

2.Integrate Google Home กับ Home Assistant

ไปที่ https://console.actions.google.com/ สมัครใช้งาน 

จากนั้นไปกดสร้าง New Project ตั้งชื่อ

หลังจากตั้งชื่อ project แล้ว จะเข้า Get Started

เลือก Smart Home เลือก Start Building

เลือก Build your Action

กด Add Action(s) จะขึ้น

Build your first Action เลือก Get Started

เลือก Smart Home เลือก Build

ตรง Fulfillment URL

นำลิงค์ tunnel ที่ได้จาก ngrok บน home assistant มาใส่แล้วตามด้วย /api/google_assistant แล้วกด save

กดปุ่มจุด 3 จุดบนมุมขวาบนแล้วเลือก Project Setting

คัดลอก Project ID ไว้

ไปที่ Develop เลือก Account linking

เลือก No, I Only want to allow accoubnt creation on my website

ที่ Linking type เลือก OAuth

https://www.duckdns.org/
ลงทะเบียน
add subdomain ex. xxxxx.duckdns.org
Copy Token
Home Assistant
Settings -> Add-ons ->
ADD-ON STORE เลือก Duckdns -> INSTALL
Configuration
Domains
Token
Save
ไปที่ info กด Start
สมัคร Let’s Encrypt เพื่อ ทำ SSL
Settings -> Add-ons ->
ADD-ON STORE เลือก Let’s Encrypt-> INSTALL
เลือก Configuration
ใส่ Domains
E-mail
กด Save
กลับมาหน้า info
กด Start


แก้ไข configuration.yaml
เพิ่ม
# enable https
http:
ssl_certificate: /ssl/fullchain.pem
ssl_key: /ssl/privkey.pem

ESPEASY DEEP SLEEP

Sleep awake time:ตื่นอยู่นานแค่ไหน วินาที

Sleep time: หลับนานแค่ไหน วินาที

Arduino Preference ESP8266 ESP32

Additional Boards Manager URLs

https://raw.githubusercontent.com/espressif/arduino-esp32/gh-pages/package_esp32_index.json, http://arduino.esp8266.com/stable/package_esp8266com_index.json

millis() ใน arduino

แบบที่ 1


					unsigned long period = 1000; //ระยะเวลาที่ต้องการรอ
unsigned long last_time = 0; //ประกาศตัวแปรเป็น global เพื่อเก็บค่าไว้ไม่ให้ reset จากการวนloop
 
void setup() {
    Serial.begin(115200);
}
 
void loop() {
   
 if( millis() - last_time > period) {

     last_time = millis(); //เซฟเวลาปัจจุบันไว้เพื่อรอจนกว่า millis() จะมากกว่าตัวมันเท่า period 


     Serial.println("Hello arduinona!");
 }
   
}


ขอบคุณ: https://www.modulemore.com/article/3/%E0%B8%A5%E0%B8%94%E0%B8%81%E0%B8%B2%E0%B8%A3%E0%B9%83%E0%B8%8A%E0%B9%89-delay-%E0%B8%AB%E0%B8%B1%E0%B8%99%E0%B8%A1%E0%B8%B2%E0%B9%83%E0%B8%8A%E0%B9%89-millis-%E0%B8%81%E0%B8%B1%E0%B8%99%E0%B8%94%E0%B8%B5%E0%B8%81%E0%B8%A7%E0%B9%88%E0%B8%B2

แนวที่ 2

				
					int period = 1000;
unsigned long time_now = 0;

void setup() {
Serial.begin(115200);
}

void loop() {
time_now = millis();

Serial.println(“Hello”);

while(millis() < time_now + period){
//wait approx. [period] ms
}
}


ติดตั้ง Teamviewer บน Raspberry PI OS

64 Bit Preview Version https://download.teamviewer.com/download/linux/teamviewer_arm64.deb

32 Bit Preview Version https://download.teamviewer.com/download/linux/teamviewer_armhf.deb

ใช้คำสั่ง wget เช่น download 32 bits

wget https://download.teamviewer.com/download/linux/teamviewer_armhf.deb

sudo dpkg -i teamviewer_armhf.deb หรือ เรียกไฟล์ติดตั้งบน desktop