ESP32 MircoPython Install

https://www.python.org/downloads/

download ตัว python-2.7.14 ที่ https://www.python.org/ftp/python/2.7.14/python-2.7.14.msi

ติดตั้ง

โปรแกรมจะสร้าง folder ที่ c:\python27

cmd ออก command prompt

พิมพ์ cd\python27  แล้ว Enter

cd Scripts

pip install esptool    //ติดตั้ง esptool

pip install adafruit-ampy

esptool.py –port COM3 flash_id   //ตรวจสอบ การเชื่อมต่อ

esptool.py –port COM3 erase_flash //ลบ flash ของเดิมออก รอติดตั้ง micropython

สลับไป เปิดเวป https://www.micropython.org/downloads/#esp32

download firmware http://micropython.org/resources/firmware/esp32-20171224-v1.9.3-217-g5de064fb.bin

เมื่อได้ไฟล์ esp32-20171224-v1.9.3-217-g5de064fb.bin มาแล้ว

copy ไปไว้ใน c:\python27 แล้ว rename เป็น esp.bin

กลับไปที่ cmd พิมพ์

esptool.py –chip esp32 –port COM3 write_flash -z 0x1000 c:\python27\esp.bin  เพื่อ upload firmware ใส่ใน esp32

เห็นหน้าตาคล้ายจอแสดงผล ในตอน compile esp32 มากเลย

หลังจาก flash สำเร็จ ลองติดต่อโดยใช้ putty

เลือก Serial COM3 115200

เท่านี้ก็เรียบโร้ย

อ้อ ลืมตัว editor


download มาแล้วใส่ใน C:\Program Files\ESPlorer

ส่ง shortcut ESPlorer.bat มาบนจอ เท่านี้ก้ใช้ได้


ที่มา:https://www.youtube.com/watch?v=ay2yuGId7Ag


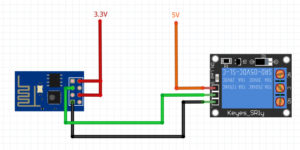
ESP8266 ESP-01 Blynk Virtual port Relay

esp-01-relay

/**************************************************************
* Blynk is a platform with iOS and Android apps to control
* Arduino, Raspberry Pi and the likes over the Internet.
* You can easily build graphic interfaces for all your
* projects by simply dragging and dropping widgets.
*
* Downloads, docs, tutorials: http://www.blynk.cc
* Sketch generator: http://examples.blynk.cc
* Blynk community: http://community.blynk.cc
* Social networks: http://www.fb.com/blynkapp
* http://twitter.com/blynk_app
*
* Blynk library is licensed under MIT license
* This example code is in public domain.
*
**************************************************************
* This example runs directly on ESP8266 chip.
*
* Note: This requires ESP8266 support package:
* https://github.com/esp8266/Arduino
*
* Please be sure to select the right ESP8266 module
* in the Tools -> Board menu!
*
* Change WiFi ssid, pass, and Blynk auth token to run 🙂
*
**************************************************************/

#define BLYNK_PRINT Serial // Comment this out to disable prints and save space
#include <ESP8266WiFi.h>
#include <BlynkSimpleEsp8266.h>

// You should get Auth Token in the Blynk App.
// Go to the Project Settings (nut icon).
char auth[] = “xxxxxxxxxxxxxxxxxxxxxxxxxx”;

// Your WiFi credentials.
// Set password to “” for open networks.
char ssid[] = “yyyyyyyyyyyyyyy”;
char pass[] = “zzzzzzzzzz”;

void setup()
{
Serial.begin(9600);
pinMode(0, OUTPUT);
pinMode(2, OUTPUT);
Blynk.begin(auth, ssid, pass);
}
BLYNK_WRITE(V1)
{
int i=param.asInt();
if (i==1)
{
delay(300);
digitalWrite(0, HIGH);
digitalWrite(2, HIGH);
delay(1750); // delay 1000 = 1 sec
digitalWrite(0, LOW);
digitalWrite(2, LOW);
}
else
{
digitalWrite(0, LOW);
digitalWrite(2, LOW);
}
}

void loop()
{
Blynk.run();
}


credit:http://docs.blynk.cc/#blynk-main-operations-get-data-from-hardware

https://community.blynk.cc/t/blynk-virtual-pin-blynk-write/7001/3

ESP8266 ESP-01 Relay Blynk #1

esp-01-relay

/**************************************************************
* Blynk is a platform with iOS and Android apps to control
* Arduino, Raspberry Pi and the likes over the Internet.
* You can easily build graphic interfaces for all your
* projects by simply dragging and dropping widgets.
*
* Downloads, docs, tutorials: http://www.blynk.cc
* Sketch generator: http://examples.blynk.cc
* Blynk community: http://community.blynk.cc
* Social networks: http://www.fb.com/blynkapp
* http://twitter.com/blynk_app
*
* Blynk library is licensed under MIT license
* This example code is in public domain.
*
**************************************************************
* This example runs directly on ESP8266 chip.
*
* Note: This requires ESP8266 support package:
* https://github.com/esp8266/Arduino
*
* Please be sure to select the right ESP8266 module
* in the Tools -> Board menu!
*
* Change WiFi ssid, pass, and Blynk auth token to run 🙂
*
**************************************************************/

#define BLYNK_PRINT Serial // Comment this out to disable prints and save space
#include <ESP8266WiFi.h>
#include <BlynkSimpleEsp8266.h>

// You should get Auth Token in the Blynk App.
// Go to the Project Settings (nut icon).
char auth[] = “xxxxxxxxxxxxxxxxxxxxxxxxxxxx”;

// Your WiFi credentials.
// Set password to “” for open networks.
char ssid[] = “yyyyyyy”;
char pass[] = “zzzzzzzzz”;

void setup()
{
Serial.begin(9600);
Blynk.begin(auth, ssid, pass);
}

void loop()
{
Blynk.run();
}

NODEMCU ESP8266 DHT22 AM2305 DS18B20 Thingspeak

// www.arduinesp.com
//
// Plot DTH11 data on thingspeak.com using an ESP8266
// April 11 2015
// Author: Jeroen Beemster
// Website: www.arduinesp.com
// ใช้กับ กล่อง วัดอุณหภูมิที่บ้าน
// 20-3-2017 ใช้งานครั้งแรก DHT22
// 19-5-2017 เพิ่ม DS18B20
// 18-12-2017 ซ่อมครั้งที่ 1 เปลี่ยน DHT22 เป็น AM2305

#include <DHT.h>
#include <ESP8266WiFi.h>
#include <OneWire.h>
#include <DallasTemperature.h>

// replace with your channel’s thingspeak API key,
String apiKey = “WXXXXXXXXX”;
const char* ssid = “AP_xxxx”;
const char* password = “1xxxxxxxx”;

const char* server = “api.thingspeak.com”;
#define DHTPIN1 D1 // d0 dht22 ext
// #define DHTPIN2 D2 // d1 dht22 mushroom
DHT dht1(DHTPIN1,DHT22,15);
// DHT dht2(DHTPIN2,DHT22,15);
#define sensorPin D2 // Data wire is plugged into pin D3 on NodeMCU
OneWire oneWire(sensorPin); // Setup the oneWire Sensor
DallasTemperature DS18B20(&oneWire); // Pass reference to Dallas Temperature.
WiFiClient client;

ADC_MODE(ADC_VCC);
// int vcc;
void setup() {
Serial.begin(115200);
delay(10);
dht1.begin();
//dht2.begin();
WiFi.begin(ssid, password);

Serial.println();
Serial.println();
Serial.print(“Connecting to “);
Serial.println(ssid);

WiFi.begin(ssid, password);

while (WiFi.status() != WL_CONNECTED) {
delay(500);
Serial.print(“.”);
}
Serial.println(“”);
Serial.println(“WiFi connected”);

}

void loop() {

float h1 = dht1.readHumidity();
float t1 = dht1.readTemperature();
float vcc = 0.00f;
vcc = ESP.getVcc()/1024.00f;
// uint32_t vcc = ESP.getVcc()/1000.0;
DS18B20.requestTemperatures();
float t2 = DS18B20.getTempCByIndex(0);
//float h2 = 0; // can’t read ds18b20 humidity
//float h2 = dht2.readHumidity();
//float t2 = dht2.readTemperature();
//if (isnan(h1) || isnan(t1) ||isnan(h2) || isnan(t2)) {
if (isnan(h1) || isnan(t1) ) {
Serial.println(“Failed to read from EXT DHT sensor 1 !”);
//return;
t1=0;
h1=0;
}
else if (isnan(t2) ) {
Serial.println(“Failed to read from DS18B20 mushroom sensor 2 !”);
//return;
t2=0;
//h2=0;
}

if (client.connect(server,80)) { // “184.106.153.149” or api.thingspeak.com
String postStr = apiKey;
postStr +=”&field1=”;
postStr += String(t1);
postStr +=”&field2=”;
postStr += String(h1);
postStr +=”&field3=”;
postStr += String(vcc);
postStr +=”&field4=”;
postStr += String(t2);
//postStr +=”&field5=”;
//postStr += String(h2);
postStr += “\r\n\r\n”;

client.print(“POST /update HTTP/1.1\n”);
client.print(“Host: api.thingspeak.com\n”);
client.print(“Connection: close\n”);
client.print(“X-THINGSPEAKAPIKEY: “+apiKey+”\n”);
client.print(“Content-Type: application/x-www-form-urlencoded\n”);
client.print(“Content-Length: “);
client.print(postStr.length());
client.print(“\n\n”);
client.print(postStr);
Serial.print(“Temperature 1: “);
Serial.print(t1);
Serial.print(” C Humidity 1: “);
Serial.print(h1);
Serial.print(” % Voltage : “);
Serial.print(vcc);
Serial.print(” V MushRoom Temperature 2: “);
Serial.print(t2);
Serial.println(” C”);
//Serial.print(” C MushRoom Humidity 2: “);
//Serial.print(h2);
//Serial.println(“% send to Thingspeak”);
}
client.stop();

Serial.println(“Waiting”);
// thingspeak needs minimum 15 sec delay between updates
// delay 1 minitue delay 1000=1sec
Serial.println(“Wifi Disconnect”);
WiFi.disconnect();
//delay(60000);
delay(100);
//โดย 1,000,000 microseconds = 1 second)
//node.dsleep(60 * 1000000)
Serial.println(“”);
Serial.println(“Deep Sleep 5 min”);
// deep sleep 1 min
//ESP.deepSleep(60 * 1000000, WAKE_RF_DEFAULT);
//deep sleep 5 min
ESP.deepSleep(360 * 1000000, WAKE_RF_DEFAULT);
//ESP.deepSleep(5*60 * 1000000);
//node.dsleep(60 * 1000000);
delay(500); // wait for deep sleep to happen
}

Forscan ตอนที่ 2.1 การติดตั้ง ELM327

ปกติ ELM327 ที่ซื้อมา จะมีแผ่น CD Driver มาให้ เพื่อให้ windows ที่ติดตั้งรู้จัก ELM327 โดย แบ่งตาม Chipset USB TTL RS232 ยอดนิยม 2 รุ่นคือ
1. FTDI
2. CH340
โดย forscan จะเน้นให้ไปใช้ chip FTDI เพราะทดสอบแล้ว เสถียรกว่า
สำหรับท่านที่ แผ่นไม่มี หาย แตก สามารถ Download ได้ที่
สำหรับ FTDI
Windows XP,Vista,7,8,10 x32 x64 (32-64Bit)
http://www.ftdichip.com/Drivers/CDM/CDM%20v2.12.26%20WHQL%20Certified.zip

***กรณีที่ไม่รู้ว่า Windows ของเรา x32(32-bits) หรือ x64(64-bits)
win7: คลิ๊กขวา ไอคอน คอมพิวเตอร์(Computer) -> คุณสมบัติ (Properties)
ตรง System Type จะบอกว่า 32-bits หรือ 64-bit
win10:คลิ๊กขวาที่ปุ่ม Start เลือก system***

สำหรับ
CH340
http://www.wch.cn/downfile/5
หรือ
http://www.arduined.eu/files/windows8/CH341SER.zip

การติดตั้ง Driver FTDI
หลังจาก download มาแล้วให้แตกไฟล์ (Extract) ออก ในที่นี้ใช้ winrar

จะได้ไฟล์ดังรูป


คลิ๊กขวาที่  ftdibus.inf กด Install

หากติดตั้งสำเร็จจะขึ้น

คลิ๊กขวาที่  ftdiport.inf กด Install

หากติดตั้งสำเร็จจะขึ้น

การติดตั้ง FTDI ใน youtube
https://www.youtube.com/watch?v=EZMZ0g1My84
เอกสารการติดตั้ง
https://learn.sparkfun.com/tutorials/how-to-install-ftdi-drivers/windows—in-depth
http://www.ftdichip.com/Support/Documents/AppNotes/AN_119_FTDI_Drivers_Installation_Guide_for_Windows7.pdf

การติดตั้ง CH340 Driver


หากไปตรวจใน device manager จะพบว่า port ทำงาน

กรณีปัญหาและการแก้ไข

forscan อาการนี้เกิดจาก หา elm327 ไม่เจอ เท่าที่เจอ ไม่ได้ลง Driver ไว้ หากไปดูที่ Device manager จะพบ ว่า  Driver ยังไม่ได้ติดตั้ง


ให้ติดตั้ง Driver ใหม่

Forscan ตอนที่ 2.2 ติดตั้ง FORScan การเพิ่ม จอเมนู Navigation ,Climate

จากตอนที่ 1 ได้กล่าวถึง อุปกรณ์ที่ใช้ในการ ทำการโปรแกรมและการเลือกซื้อไปแล้วแล้ว
และ ตอนที่ 2.1 กล่าวถึง การติดตั้ง Driver ELM327
และตอนนี้จะกล่าวถึงตัวโปรแกรม ต่อ

โปรแกรม forscan เป็นหนึ่งในหลายโปรแกรมที่ใช้ในการปิดเปิดฟังก์ชั่นในรถ ford หรืออื่นๆ ได้ เขียนโดยโปรแกรมเมอร์ชาวรัสเซีย

อีกตัวนึงที่ศูนย์รถ ร้านซ่อม ในต่างประเทศรวมทั้งบ้านเราใช้กัน คือ Ford IDS ซึ่งต้องใช้คู่กับกล่อง VCM สร้างโดย ford motorcraft สามารถ เปิดปิดได้หลายอย่าง สามารถ load โปรแกรมเกียร์รุ่นล่าๆ มาใส่รถได้ และอื่นๆ  อีกมากมาย รุ่นปกติต้องซื้อลิขสิทธิ์กันแพงน่าดู
(ถ้าไม่ crack) แต่ช่างมันเถอะเพราะไม่เกี่ยวกับเราในหัวข้อนี้

ก่อนอื่น ไป download forscan ที่
http://www.forscan.org/download.html
Download  โปรแกรม Forscan รุ่นล่่าสุด

จากนั้นเมื่อได้ไฟล์แล้ว ทำการติดตั้ง การติดตั้งก็ไม่ยาก Next ลูกเดียว มีคลิ๊ก Accept บ้าง เมื่อติดตั้งเสร็จจะมี ไอคอนรูป Forscan ดังรูป

คลิ๊กที่ไอคอน Forscan เปิดโปรแกรม
กด OK ข้ามขั้นตอนต่างๆไป
จากนั้นกดรูป พวงมาลัย ล่างสุด จะเห็น Hardware id กด Copy to Clipboard
หรือจด Hardware id ไว้

จากนั้นสมัครสมาชิก (Register) ใน forum http://www.forscan.org/forum/

เมื่อเป็นสมาชิกแล้ว ไปขอ Extended License ฟรี มีอายุ 2 เดือนที่

http://forscan.org/forum/extlic.php

ในนี้จะมีให้กรอก ชื่อ นามสกุล,เบอร์โทร, Hardware ID

กด Generate
จะมีช่องให้ Download จะได้ไฟล์มา ชื่อ FORScanLicense.key
จากนั้นเปิดโปรแกรม Forscan
กด OK ข้ามขั้นตอนต่างๆไป
จากนั้นกดรูป พวงมาลัย ล่างสุด
กดปุ่ม Load License Key กดหาไฟล์ FORScanLicense.key กด OK

โปรแกรมจะทำงานเต็มทุก เมนู ให้เราซ่าได้ไปอีกสองเดือน

ติ๊งต่างว่า เรามีของครบแล้ว เรารออะไรอยู่ล่ะครับ ก็พุ่งไปที่รถ

– ดึงฝาปิด (กระชากเพราะดึงเบาๆไม่ออก)  กล่องฟิวส์ภายห้องโดยสารตรงเข่าคนขับออกมา

สังเกตว่าช่อง ELM327 OBDII เป็นรูปสี่เหลี่ยมคางหมู เสียบกับช่อง OBDII สีขาว
เสียบยังไงก็ไม่ผิด ผิดก็เสียบไม่ได้

– เสียบ ELM327 เข้าที่ช่องสีขาว เสียบไปตรงๆ
– เปิดคอมพิวเตอร์ รอ จนขึ้นหน้า desktop
– เสียบสาย usb ของ ELM327 เข้าช่อง USB ของคอมพิวเตอร์
– เปิดโปรแกรม Forscan ขึ้นมา
– บิดกุญแจรถไปที่ ON (แต่ไม่ต้อง สตาร์ทเครื่อง)

โปรแกรมจะขึ้นคำเตือน ที่ท่านควรสนใจ

แปลบ้านๆว่า

การลงทุน (ใช้คอมและโปรแกรมกับรถ) มีความเสี่ยง ผู้ลงทุน(ทำ)ควรศึกษาข้อมูลก่อนการตัดสินใจลงทุน (ทำ)

อ่านจบแล้ว ก็ปิดเครื่องเก็บของ แล้วไปให้คนที่เชี่ยวชาญจ้างร้านทำดีกว่า เสียเงินหน่อยสบายใจ

สำหรับคนที่อยาก D.I.Y. ก็เดินต่อ
กด OK

โปรแกรมจะขึ้นหน้า warning เตือนให้
-บิดกุญแจไป ON
– สวิทช์ HS/MS CAN ของ ELM327  ต้องอยู่ตำแหน่ง HS CAN (กรณีตั้งผิด ก็ปิดโปรแกรมเปิดใหม่)
– อย่าเคลื่อนรถ
พร้อมแล้วก็กด OK

โปรแกรมจะขึ้น Feedback need แสดง profileของรถ ที่เคยบันทึกไว้ ถ้ามีอยู่แล้ว จะถามว่าจะ load ของเดิมมาหรือไม่ ในที่นี้ตอบ No เพราะเราจะบันทึกใหม่ รถแต่ละคันจะมี profile ต่างกันนะครับ

โปรแกรมจะค้นหาอุปกรณ์ Module ต่างๆ ที่เชื่อมต่อในระบบรถ
ขึ้น feedback need ถามว่า อุปกรณ์เรารองรับ hs/mscan หรือไม่ ตอบ yes
3
โปรแกรมขึ้น Action need ให้เราโยกสวิทช์ที่ ELM327 มาที่ตำแหน่ง MS CAN
แล้วกด OK

โปรแกรมจะอ่านตัวอุปกรณ์ Module ทั้งหมดที่เชื่อมต่อในรถ ออกมา

เมื่อทำมาถึงจุดนี้ก็แสดงว่า ผ่านมาเกือบครึ่งเรื่อง แต่หนังยังไม่จบ
ตอนต่อไป (ถ้ามีเวลาจะกล่าวถึง) การทำงานของแต่ละเมนู การอ่านและเคลียรโค๊ด Error
การตั้งโปรแกรม ในส่วนที่หน้าสนใจ การคำนวน Checksum