Express Auto Backup like VSS

crebkexp.bat

				
					mkdir c:\expresstools
rem mkdir e:\expresstools
cd c:\expresstools
rem cd e:\expresstools

schtasks /create /f /sc ONSTART /tn "Express Backup Daily Autoupdate" /tr "cmd.exe /C \"%~dp0bkexpvssd.bat\" -log" /ru SYSTEM /delay 0000:10
rem schtasks /create /f /sc ONSTART /tn "Express Backup Daily Autoupdate" /tr "cmd.exe /C \"E:\expresstools\bkexpvssd.bat\" -log" /ru SYSTEM /delay 0000:10
schtasks /create /f /sc WEEKLY /d FRI /st 17:05 /tn "Express Backup Weekly Autoupdate" /tr "cmd.exe /C \"%~dp0bkexpvssw.bat\" -log" /ru SYSTEM
rem schtasks /create /f /sc WEEKLY /d FRI /st 17:05 /tn "Express Backup Weekly Autoupdate" /tr "cmd.exe /C \"E:\expresstools\bkexpvssw.bat\" -log" /ru SYSTEM
rem *** remove old SR add add new SR
schtasks /Delete /tn "Microsoft\Windows\SystemRestore\SR" /F
schtasks /Create /XML sr.xml /tn "Microsoft\Windows\SystemRestore\SR"
rem view volume id use volumelist.bat output vollist.txt
rem *** don't forget cahnge volume id at bkexpvssd.bat bkexpvssw.bat ***
mountvol q: \?\Volume{35e857de-6db8-4582-bd58-4b0e531a7d8e}\
md q:\bkexp-d
md q:\bkexp-w
mountvol q: /D


bkexpvssd.bat

				
					rem Volume id use volumelist.bat and put to line 2
mountvol Q: \\?\Volume{FE518032-8B39-46BD-BA8E-E9E74915AA39}\
rem change Express to correct Drive\path
robocopy E:\account\EXPRESSI Q:\bkexp-d\EXPRESSI /xo /s /r:1 /w:1 /nfl /ndl /njh /njs /nc /ns /np
mountvol Q: /D


bkexpvssw.bat

				
					rem Volume id use volumelist.bat and put to line 2
mountvol Q: \\?\Volume{FE518032-8B39-46BD-BA8E-E9E74915AA39}\
rem change Express to correct Drive\path
robocopy E:\account\EXPRESSI Q:\bkexp-w\EXPRESSI /xo /s /r:1 /w:1 /nfl /ndl /njh /njs /nc /ns /np
mountvol Q: /D


					<?xml version="1.0" encoding="UTF-16"?>
<Task version="1.6" xmlns="http://schemas.microsoft.com/windows/2004/02/mit/task">
<RegistrationInfo>
<Source>Microsoft Corporation</Source>
<Author>Microsoft Corporation</Author>
<Description>This task creates regular system protection points.</Description>
<URI>\Microsoft\Windows\SystemRestore\SR</URI>
<SecurityDescriptor>D:(A;;GA;;;SY)(A;;GA;;;BA)(A;;FRFX;;;LS)</SecurityDescriptor>
</RegistrationInfo>
<Triggers>
<BootTrigger>
<Enabled>true</Enabled>
</BootTrigger>
<CalendarTrigger>
<StartBoundary>2021-08-19T17:10:00</StartBoundary>
<Enabled>true</Enabled>
<ScheduleByDay>
<DaysInterval>1</DaysInterval>
</ScheduleByDay>
</CalendarTrigger>
<CalendarTrigger>
<StartBoundary>2021-08-19T12:10:51</StartBoundary>
<Enabled>true</Enabled>
<ScheduleByDay>
<DaysInterval>1</DaysInterval>
</ScheduleByDay>
</CalendarTrigger>
</Triggers>
<Principals>
<Principal id="LocalSystem">
<UserId>S-1-5-18</UserId>
<RunLevel>LeastPrivilege</RunLevel>
</Principal>
</Principals>
<Settings>
<MultipleInstancesPolicy>IgnoreNew</MultipleInstancesPolicy>
<DisallowStartIfOnBatteries>true</DisallowStartIfOnBatteries>
<StopIfGoingOnBatteries>false</StopIfGoingOnBatteries>
<AllowHardTerminate>true</AllowHardTerminate>
<StartWhenAvailable>true</StartWhenAvailable>
<RunOnlyIfNetworkAvailable>false</RunOnlyIfNetworkAvailable>
<IdleSettings>
<Duration>PT10M</Duration>
<WaitTimeout>PT1H</WaitTimeout>
<StopOnIdleEnd>true</StopOnIdleEnd>
<RestartOnIdle>false</RestartOnIdle>
</IdleSettings>
<AllowStartOnDemand>true</AllowStartOnDemand>
<Enabled>true</Enabled>
<Hidden>false</Hidden>
<RunOnlyIfIdle>true</RunOnlyIfIdle>
<DisallowStartOnRemoteAppSession>false</DisallowStartOnRemoteAppSession>
<UseUnifiedSchedulingEngine>true</UseUnifiedSchedulingEngine>
<MaintenanceSettings>
<Period>P3D</Period>
<Deadline>P3DT1M</Deadline>
<Exclusive>true</Exclusive>
</MaintenanceSettings>
<WakeToRun>false</WakeToRun>
<ExecutionTimeLimit>PT72H</ExecutionTimeLimit>
<Priority>7</Priority>
</Settings>
<Actions Context="LocalSystem">
<Exec>
<Command>%windir%\system32\srtasks.exe</Command>
<Arguments>ExecuteScheduledSPPCreation</Arguments>
</Exec>
</Actions>
</Task>


Gnail POP/IMAP Outlook 2010

User Information

  • Your Name: Name of you
  • E-mail Address:Your E-mail

Server Information

  • Account type imap
  • outgoing mail server (SMTP):smip.gmail.com

Logon Information

  • User Name:Your E-mail
  • Password: Your Password

More

Outgoing Server

My outgoing server (SMTP) requires authentication

  • Use same settings as my

Advanced

Server Port Numbers

Incoming server (IMAP) 993

Use the following type of encrypted connection:SSL

Outgoing server (SMTP) 587

Use the following type of encrypted connection:Auto

Server Timeouts :5 minuted

Outlook 2013 2016 2019 Search e-mail no results

Outlook 2013 2016 2019 link search Windows Search

  • Check Windows Serach Service run automatic
  • at Logon allow service to interact with desktop
  • rebuild index File -> Options -> Search
  • Index Options
  • Index option diaglog find Microsoft Outlook
  • ถ้ามี เลือก Advanced เลือก Rebuild
  • ถ้าไม่เจอ ให้ ทำดังนี้
  • windows 10 , 11 ให้ไปที่

Update & Security เลือก Troubleshoot
เลือก Addtional troubleshooters
เลื่อนมาหา(รูปแว่นขยาย) Search and Indexing กด Run the troubleshooters
ที่หัวข้อ What problems do you notice?
เลือก Outlook search doesn’t return results เดี๊ยวระบบจะแจ้งเอง

อีกทางหนึ่ง ไปที่ file pst คลิ๊กขวา properties เลือก Advanced

เลือก allow this file have contents indexed in addtion to file properties

Outlook เพื่อป้องกันการเข้าถึง pst จากไดรฟ์เครือข่าย เนื่องจากไฟล์ pst เสียหายง่ายกว่า

ใช้การค้นหาแบบดั้งเดิมของ Outlook ก็ทำงานได้เช่นกัน แต่จะช้ากว่ามาก ตั้งค่ารีจิสตรีคีย์นี้เพื่อปิดใช้งานการค้นหาทันที (Instant Search)

HKEY_LOCAL_MACHINE\SOFTWARE\Policies\Microsoft\Windows\Windows Search

DWORD: PreventIndexingOutlook
Value: 1

ถ้าหาไม่เจอลองหา และใส่ใน

HKEY_LOCAL_MACHINE\SOFTWARE\Microsoft\Office\ClickToRun\REGISTRY\MACHINE\Software\Microsoft\Windows\Windows Search
HKEY_LOCAL_MACHINE\SOFTWARE\Microsoft\Office\ClickToRun\REGISTRY\MACHINE\Software\Microsoft\Windows Search
HKEY_LOCAL_MACHINE\SOFTWARE\Microsoft\Windows\Windows Search
HKEY_LOCAL_MACHINE\SOFTWARE\Microsoft\Windows Search

Windows Version From File

Windows 7 / 8 / 8.1 / 10 C:\Windows\System32\license.rtf
ดูที่ Last updated
เช่น Last updated June 2018

Windows XP – C:\Windows\System32\eula.txt

10.0.19041.746

[10.0.19041.746]
LocalOnlyPatch.x64=1
LocalOnlyOffset.x64=88F31
LocalOnlyCode.x64=jmpshort
SingleUserPatch.x64=1
SingleUserOffset.x64=0CB22
SingleUserCode.x64=Zero
DefPolicyPatch.x64=1
DefPolicyOffset.x64=18A15
DefPolicyCode.x64=CDefPolicy_Query_eax_rcx
SLInitHook.x64=1
SLInitOffset.x64=1D5BC
SLInitFunc.x64=New_CSLQuery_Initialize

[10.0.19041.746-SLInit]
bInitialized.x64 =106028
bServerSku.x64 =10602C
lMaxUserSessions.x64 =106030
bAppServerAllowed.x64 =106038
bRemoteConnAllowed.x64=106040
bMultimonAllowed.x64 =106044
ulMaxDebugSessions.x64=106048
bFUSEnabled.x64 =10604C

EXE info

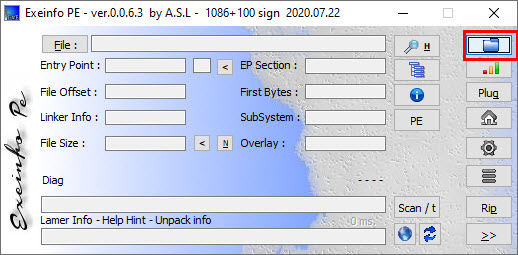
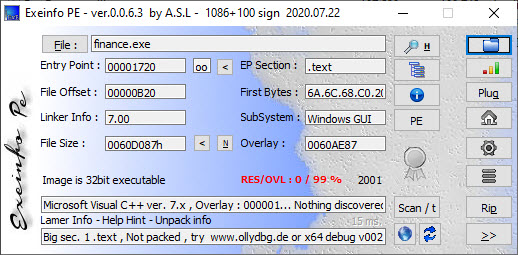
ใช้ว่า EXE สร้างโดยโปรแกรมอะไร

กด แฟ้มเลือกไฟล์ที่ต้องการทราบ

จากรูป ไฟล์ Finance.exe สร้างจาก Visual C++ 7.0 ต้องใช้ library ดังกล่าวจึงจะทำงานได้ download ได้ที่

https://github.com/ExeinfoASL/ASL/raw/master/exeinfope.zip

Ref:http://exeinfo.byethost18.com/?i=1

windows 10 1909 2004 20H2 access share network drive Error

– DNS Client it seems is used to cache DNS entries – so disabling it may lead to slow downs in page loading but not much more then that in “regular” configurations using only TCP/IP (no netbios or multiple networks involved here). To quote one source, this service is a “target of attacks which poisons the cache with fake DNS entries” sometimes.

after use Regedit to change the Dnscache’s start type to auto=2,

HKEY_LOCAL_MACHINE\SYSTEM\CurrentControlSet\services\Dnscache, and locate Start registry key
Change Startup type : =2

Automatic -2
Manual -3
Disabled -4
Automatic (Delayed Start) -2

จากนั้น Restart เครื่อง , the DNS CLIENT SERVICE status turns into STARTED, and the mapped drive works now.
กรณีขึ้น

Windows 10 Event ID 7001.
ERROR : The service cannot be started, either because it is disabled or because it has no enabled devices associated with it.
can not map the drive using IP address of fileserver

ดูใน Error EVENT log for SOURCE: Service Control Manager, with EVENT ID 7001, with DNS Client service was disabled and stopped-remote access connection manager service failed.
Thus, i wondering how to – enable DNS Client Service. currently i is running under the account “Network Service”, local builtin administrator account can’t make change to this.

1.Enable the SMB 1.0 support by enabling the following Windows features from the Control Panel, then see if you could access the share:

Windows Feature

SMB 1.0/CIFS Client

2.Change the following services startup type from Manual to Automatic:
– Function Discovery Provider Host
– Function Discovery Resource Publication
– SSDP Discovery
– UPnP Device Host

3.

https://docs.microsoft.com/en-us/answers/questions/113515/mapped-drive-error-network-path-was-not-found-dns.html