QuasarARM การกลับมาแก้ตัวอีกครั้ง #1
ปี 2558 ภาคใต้เกิดปัญหาสามจังหวัด มีระเบิดหลายจุด เลยมีความ มีความสนใจทดลองทำเครื่องตรวจโลหะ เพื่อค้นหาวัตถุระเบิดที่ฝังดินอยู่ ประกอบกับ ทองแพง โชคดีอาจมีคุณสมบัติตรวจหาทองได้ด้วย เลยคุยโวโอ้อวดโม้ไว้กับพี่ชายและภรรเมียไว้ โดยเฉพาะเมีย บอกว่าจะทำเครื่องหาทอง เพื่อจะได้ไม่ขัดขวางโครงการ
ประมาณ เมษา 58 เริ่มค้นหาข้อมูล Google เครื่องตรวจจับโลหะ ก็มีหลายแบบมาก ส่วนใหญ่จะ บอกเป็นนัยๆ แล้วก็ขายของ หรือ วงจรระบบ มีแต่โบราณมากๆ หาไปก็ลงตัวที่แบบของรัสเซีย ชื่อว่า Quasar ซึ่งพัฒนามาหลายรุ่น จนพบว่า รุ่นหนึ่งชื่อว่า QuasarARM เริ่มพัฒนามาตั้งแต่มี 2556 (2013) ล่าสุดในตอนนั้น
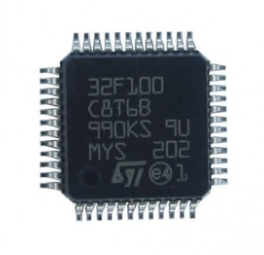
 หัวใจเป็น Arm Cortex-M3 Microcontrollers ของ STMicroelectronics ชื่อ STM32F100 ดูแล้วไม่โบราณ แบบ อนาลอค แน่นอนว่า การอัพเดทอะไร ด้วย Firmware ทันสมัยไม่หยอก
 ด้วยความบ้าบิ่น ไฟแรง และเมื่อได้วงจรมาแล้ว ก็ทำการแกะข้อมูล แปลภาษารัสเซีย ซึ่งยากมาก Google Translate ช่วยได้เล็กน้อย แปลแล้ว งงในงง ในส่วนศัพท์ทางอิเล็กทรอนิกส์ของรัสเซียกับบ้านเราต่างกัน บ้านเรา มาตรฐานสากล นี่ งงมากๆ เช่น Capacitor เขียน 15 เฉยๆ คือ 15pf 4700 คือ 4.7nf 0,033 คือ 33nf 0,1 คือ 100nf 1,0 คือ 1 uf ไม่เข้าใจจนต้อง e-mail ไปถามคุณ fandy เจ้าของ Quasar ซึ่งเค้าดูแปลกใจ เล็กน้อย และดูจะไม่อยากตอบเท่าไหร่ เข้าใจว่า เหมือนโปรขั้นเทพ คุยกับเด็กพึ่งหัด พอได้รายละเอียดซึ่งผมคิดว่าสมบูรณ์แล้ว (จริงๆ คือไม่สมบูรณ์เลย ยังมั่วอยู่มาก )
ก็เริ่มซื้ออุปกรณ์ STM32 Capacitor ,Resistor ทั้งการซื้อจากตัวต้วแทนในไทย บ้านหม้อ โชคชัย Electronics Source ฯลฯ ส่วนใหญ่จะของที่ต้องการจะไม่มี มีก็แพง เลยค้นหาจาก Online จาก Mouser Electronics ,RS-Online ,Digikey Online มีของที่ต้องการ แต่แพงและ ในช่วงหลัง มาพบ WT ออนไลน์ ในไทย พบว่าของไม่แพง
หาอุปกรณ์เสริมจาก Aliexpress,Alibaba ได้
ST-Link V2 ตะกั่วเหลว ,ทองแดงซับตะกั่ว , หัวทิปหัวแร้ง ,ที่จับ SMD (ได้มาแต่ไม่สมบูรณ์ ปัจจุบันใช้ปากคีบ)
ชิ้นส่วน ได้ LCD Blue 16×2 5V เอามา 5 ตัว
STM32F100 4 ตัว ตัวละ 0.9US 67 บาท ค่าเงิน 1 us =35.6 บาท (2015-2558) ซึ่ง STM ชุดนี้ได้เอามาใช้ใน ชุดปัจจุบันที่ทำงานได้ด้วย
น่าแปลกใจว่า ทำไมในขณะนั้นผมไม่ได้ซื้อชิ้นส่วนประกอบ ทั้ง R C ทาง Aliexpress เลย
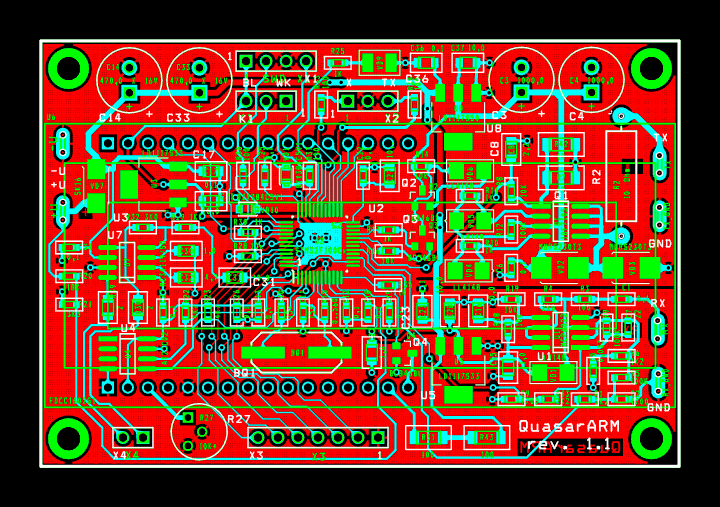
ในส่วน PCB ประกอบ เป็นวงจร พบว่า Quasar มี ไฟล์ Lay6 ซึ่งเป็น PCB Layout มาแล้ว แต่ใช้ไม่เป็น ลองหา หา Protel มาเขียน PCB เพราะเคยใช้นานแล้ว แต่ยาก เลยหาข้อมูลพบกว่า ไฟล์ Lay6 ใช้โปรแกรม Sprint Layout 6.0 (สร้างโดย Abacom Engineer เยอรมัน) ในการ เปิดไฟล์ PCB มาแก้ โปรแกรม Sprint Layout เท่าที่ดูหลายเวป นิยมในแุถวยุโรปตะวันออกมาก ใช้ง่าย crack ได้ สามารถแปลงเป็น Gerber เพื่อส่งไปทำ PCBได้เลย และแก้ไขเล็กน้อย ได้เป็น PCB ไฟล์ ที่ต้องการ
เดือน กรกฎาคม 2558 สั่งทำ PCB Online จาก PCBway China (ตอนนั้นอยู่ Hong kong) เพราะติดต่อบ้านเรา หลายที่ทำไม่ได้ (ซีเกท เซอร์กิต) ที่ทำได้ก็แพงมาก หลายพัน มีขั้นต่ำ ได้มา 5 แผ่น 24 US 8 ร้อยกว่าบาท ค่าเงิน 1 us =35.6 บาท (2015-2558) รอประมาณ ครึ่งเดือนได้ของ ดีใจมากๆ เป็นประสบการณ์การสั่ง PCB Online ครั้งแรกๆ
เมื่อของมาเกือบครบ แล้วก็เริ่มประกอบ และเพิ่งพบว่า นรกที่แท้ทรู เพิ่งเริ่มนั่นเอง
ด้วยความบ้าบิ่น ไฟแรง และเมื่อได้วงจรมาแล้ว ก็ทำการแกะข้อมูล แปลภาษารัสเซีย ซึ่งยากมาก Google Translate ช่วยได้เล็กน้อย แปลแล้ว งงในงง ในส่วนศัพท์ทางอิเล็กทรอนิกส์ของรัสเซียกับบ้านเราต่างกัน บ้านเรา มาตรฐานสากล นี่ งงมากๆ เช่น Capacitor เขียน 15 เฉยๆ คือ 15pf 4700 คือ 4.7nf 0,033 คือ 33nf 0,1 คือ 100nf 1,0 คือ 1 uf ไม่เข้าใจจนต้อง e-mail ไปถามคุณ fandy เจ้าของ Quasar ซึ่งเค้าดูแปลกใจ เล็กน้อย และดูจะไม่อยากตอบเท่าไหร่ เข้าใจว่า เหมือนโปรขั้นเทพ คุยกับเด็กพึ่งหัด พอได้รายละเอียดซึ่งผมคิดว่าสมบูรณ์แล้ว (จริงๆ คือไม่สมบูรณ์เลย ยังมั่วอยู่มาก )
ก็เริ่มซื้ออุปกรณ์ STM32 Capacitor ,Resistor ทั้งการซื้อจากตัวต้วแทนในไทย บ้านหม้อ โชคชัย Electronics Source ฯลฯ ส่วนใหญ่จะของที่ต้องการจะไม่มี มีก็แพง เลยค้นหาจาก Online จาก Mouser Electronics ,RS-Online ,Digikey Online มีของที่ต้องการ แต่แพงและ ในช่วงหลัง มาพบ WT ออนไลน์ ในไทย พบว่าของไม่แพง
หาอุปกรณ์เสริมจาก Aliexpress,Alibaba ได้
ST-Link V2 ตะกั่วเหลว ,ทองแดงซับตะกั่ว , หัวทิปหัวแร้ง ,ที่จับ SMD (ได้มาแต่ไม่สมบูรณ์ ปัจจุบันใช้ปากคีบ)
ชิ้นส่วน ได้ LCD Blue 16×2 5V เอามา 5 ตัว
STM32F100 4 ตัว ตัวละ 0.9US 67 บาท ค่าเงิน 1 us =35.6 บาท (2015-2558) ซึ่ง STM ชุดนี้ได้เอามาใช้ใน ชุดปัจจุบันที่ทำงานได้ด้วย
น่าแปลกใจว่า ทำไมในขณะนั้นผมไม่ได้ซื้อชิ้นส่วนประกอบ ทั้ง R C ทาง Aliexpress เลย
ในส่วน PCB ประกอบ เป็นวงจร พบว่า Quasar มี ไฟล์ Lay6 ซึ่งเป็น PCB Layout มาแล้ว แต่ใช้ไม่เป็น ลองหา หา Protel มาเขียน PCB เพราะเคยใช้นานแล้ว แต่ยาก เลยหาข้อมูลพบกว่า ไฟล์ Lay6 ใช้โปรแกรม Sprint Layout 6.0 (สร้างโดย Abacom Engineer เยอรมัน) ในการ เปิดไฟล์ PCB มาแก้ โปรแกรม Sprint Layout เท่าที่ดูหลายเวป นิยมในแุถวยุโรปตะวันออกมาก ใช้ง่าย crack ได้ สามารถแปลงเป็น Gerber เพื่อส่งไปทำ PCBได้เลย และแก้ไขเล็กน้อย ได้เป็น PCB ไฟล์ ที่ต้องการ
เดือน กรกฎาคม 2558 สั่งทำ PCB Online จาก PCBway China (ตอนนั้นอยู่ Hong kong) เพราะติดต่อบ้านเรา หลายที่ทำไม่ได้ (ซีเกท เซอร์กิต) ที่ทำได้ก็แพงมาก หลายพัน มีขั้นต่ำ ได้มา 5 แผ่น 24 US 8 ร้อยกว่าบาท ค่าเงิน 1 us =35.6 บาท (2015-2558) รอประมาณ ครึ่งเดือนได้ของ ดีใจมากๆ เป็นประสบการณ์การสั่ง PCB Online ครั้งแรกๆ
เมื่อของมาเกือบครบ แล้วก็เริ่มประกอบ และเพิ่งพบว่า นรกที่แท้ทรู เพิ่งเริ่มนั่นเอง
 เริ่มจากนรก ขุมแรก การบัดกรี STM31F100C8 เป็น SMD แบบ LQFP48 ขาเล็กมาก ขนาด 0.22 มม. ระยะห่างระหว่างขา0.28 มม. แรกๆ ใช้หัวแร้งธรรมดา หัวใหญ่ ปาดไม่ดี ตะกั่วติดขาเป็นทาง ต้องใช้ แถบทองแดงไว้ดูดตะกั่ว ลองใช้ตะกั่วเหลวร่วมกับที่เป่าลมร้อน ที่ซื้อมานานแล้ว แต่เป่าแล้วอุปกรณ์พัง เลยไม่ค่อยได้ใช้ อาจเพร่าะศึกษามาไม่ดี แต่มันก็มีประโยชน์ เพราะมี หัวแร้งปรับอุณหภูมิ มาด้วย ปลายแหลมเปี๊ยบ (ในตอนนั้น) และได้นำมาใช้ในเวลาต่อมา ไว้บัดกรี รวมทั้งสั่งหัวตะกั่วบัดกรีมาใหม่ แต่ดันใส่กับหัวแร้งเดิมไม่ได้ 🙁 รวมทั้งมีส่วนในความสำเร็จขั้นหนึ่งในโปรเจคแก้ตัวในปัจจุบัน (ผลงาน 2 PCB QuasarARM 0.5 วงจรทำงาน เสีย 1 PCB รอซ่อม ขา CPU) ที่จริงผมก็ซื้อ หัวแร้งมาใหม่นะ แต่ขาดันไม่ตรงกัน ต้องรอโมดิฟาย พอจะใช้ก็หาไม่เจอ เดีํยวเจอแล้วจะเอามาใช้
สิ่งที่ผมขาดไปคือแว่นขยาย ซึ่งเหมาะแก่การบัดกรีอุปกรณ์เล็กๆ ในเวลาต่อมาผมก็หาซื้อได้่
หลังจากบัดกรี STM32 ไป สาม PCB ก็ลองหาอันที่ เหมาะสมที่คิดว่ารอด และหวังว่า อันที่เหลือ จะเป่าออก แล้วบัดกรีใหม่ในเวลาอันเหมาะสม ซึ่งเวลานั้นยังไม่เคยเกิดขึ้นเลยจนถึงปัจจุบัน
ต่อมาก็บัดกรี SMD Capacitor และ Resistor ที่ได้มาตาม ยถากรรม ใหญ่บ้างเล็กบ้าง ค่าตรงมั่ง ใกล้เคียงบ้าง ลุยบัดกรีจนเกือบครบ
หลังจากลุยดึกมาเป็นสัปดาห์ก็บัดกรีเสร็จ
ก็ได้เวลา ทดลองจ่ายไฟ แล้ว พบว่าไม่ทำงาน ก็พยายามวัดโน้นนี่นั่น ไปเรื่อย นำไปสู่การบัดกรีอันที่ 2 ทดลองเชื่อมระบบ ST Link V2 กับวงจรแต่ไม่สำเร็จ
ข้อสันนิษฐานในตอนนั้นคือ ตัว Microcontroller STM32F100 อาจถูกความร้อนจากที่เป่าลมร้อนจนเสียหาย อาจต้องเปลี่ยน Microcontroller ทิ้ง
ในเวลาถัดมา การมาถึงของสิ่งใหม่ ก็ยุติทุกอย่าง นั่นคือการมาถึงของ DJI Phantom 2 Drone ทำให้โครงการเครื่องตรวจโลหะ หยุดลงชั่วคราว
มีนาคม 2559 สั่งหัวเป่าลมร้อนมาเพิ่ม เพื่อจะถอด STM32 อุปกรณ์ออก สั่ง GM328 ตัววัด Transistor ว่าเป็นแบบ MOS,NPN,PNP และวัดค่า L C R มาในตัว แต่ก็ไม่ได้ทำต่อ และหยุดโครงการไว้เพียงเท่านี้ เก็บเรื่องนี้ เป็นแผลลึกๆ ในใจในการทำงานด้านอิเล็กทรอนิกส์ ที่ไม่ได้เรื่องครั้งหนึ่ง และเป็นเรื่องให้ภรรเมียยกมาพูดในแต่ละครั้ง พูดทีไรแทงใจทุกที รอวันนานไปเรื่องนี้คงเงียบลง นานๆ จะยกอุปกรณ์มาดูสักครั้งเป็นที่ระลึก
เมื่อต้นปี 2563 นี้ ภรรยาได้หยิบยกเรื่องนี้มาพูดขึ้นอีกครั้ง ผมรู้สึกว่า เรื่องนี้ยังไม่จบ และจะต้อง ทำไมมันใช้ได้ ดังนั้นผมจึงค้นหาข้อมูลใหม่อีกครั้ง พบหลายปีมานี้ QuasarARM พัฒนามาเรื่อยๆ ทั้งอุปกรณ์และ firmware มีขายทั้งอุปกรณ์สำเร็จ (ราคาก็แพงเหมือนเดิม) มีข้อข้อมูลที่ เป็นสากลมากขึ้นและละเอียดมากขึ้น และเราสามารถซื้อชิ้นส่วนอุปกรณ์ออนไลน์จาก aliexpress และที่อื่นๆ ได้ ในราคาจับต้องได้
เอาน่ามาลองกันอีกซักตั้ง สู้โว้ย
เริ่มจากนรก ขุมแรก การบัดกรี STM31F100C8 เป็น SMD แบบ LQFP48 ขาเล็กมาก ขนาด 0.22 มม. ระยะห่างระหว่างขา0.28 มม. แรกๆ ใช้หัวแร้งธรรมดา หัวใหญ่ ปาดไม่ดี ตะกั่วติดขาเป็นทาง ต้องใช้ แถบทองแดงไว้ดูดตะกั่ว ลองใช้ตะกั่วเหลวร่วมกับที่เป่าลมร้อน ที่ซื้อมานานแล้ว แต่เป่าแล้วอุปกรณ์พัง เลยไม่ค่อยได้ใช้ อาจเพร่าะศึกษามาไม่ดี แต่มันก็มีประโยชน์ เพราะมี หัวแร้งปรับอุณหภูมิ มาด้วย ปลายแหลมเปี๊ยบ (ในตอนนั้น) และได้นำมาใช้ในเวลาต่อมา ไว้บัดกรี รวมทั้งสั่งหัวตะกั่วบัดกรีมาใหม่ แต่ดันใส่กับหัวแร้งเดิมไม่ได้ 🙁 รวมทั้งมีส่วนในความสำเร็จขั้นหนึ่งในโปรเจคแก้ตัวในปัจจุบัน (ผลงาน 2 PCB QuasarARM 0.5 วงจรทำงาน เสีย 1 PCB รอซ่อม ขา CPU) ที่จริงผมก็ซื้อ หัวแร้งมาใหม่นะ แต่ขาดันไม่ตรงกัน ต้องรอโมดิฟาย พอจะใช้ก็หาไม่เจอ เดีํยวเจอแล้วจะเอามาใช้
สิ่งที่ผมขาดไปคือแว่นขยาย ซึ่งเหมาะแก่การบัดกรีอุปกรณ์เล็กๆ ในเวลาต่อมาผมก็หาซื้อได้่
หลังจากบัดกรี STM32 ไป สาม PCB ก็ลองหาอันที่ เหมาะสมที่คิดว่ารอด และหวังว่า อันที่เหลือ จะเป่าออก แล้วบัดกรีใหม่ในเวลาอันเหมาะสม ซึ่งเวลานั้นยังไม่เคยเกิดขึ้นเลยจนถึงปัจจุบัน
ต่อมาก็บัดกรี SMD Capacitor และ Resistor ที่ได้มาตาม ยถากรรม ใหญ่บ้างเล็กบ้าง ค่าตรงมั่ง ใกล้เคียงบ้าง ลุยบัดกรีจนเกือบครบ
หลังจากลุยดึกมาเป็นสัปดาห์ก็บัดกรีเสร็จ
ก็ได้เวลา ทดลองจ่ายไฟ แล้ว พบว่าไม่ทำงาน ก็พยายามวัดโน้นนี่นั่น ไปเรื่อย นำไปสู่การบัดกรีอันที่ 2 ทดลองเชื่อมระบบ ST Link V2 กับวงจรแต่ไม่สำเร็จ
ข้อสันนิษฐานในตอนนั้นคือ ตัว Microcontroller STM32F100 อาจถูกความร้อนจากที่เป่าลมร้อนจนเสียหาย อาจต้องเปลี่ยน Microcontroller ทิ้ง
ในเวลาถัดมา การมาถึงของสิ่งใหม่ ก็ยุติทุกอย่าง นั่นคือการมาถึงของ DJI Phantom 2 Drone ทำให้โครงการเครื่องตรวจโลหะ หยุดลงชั่วคราว
มีนาคม 2559 สั่งหัวเป่าลมร้อนมาเพิ่ม เพื่อจะถอด STM32 อุปกรณ์ออก สั่ง GM328 ตัววัด Transistor ว่าเป็นแบบ MOS,NPN,PNP และวัดค่า L C R มาในตัว แต่ก็ไม่ได้ทำต่อ และหยุดโครงการไว้เพียงเท่านี้ เก็บเรื่องนี้ เป็นแผลลึกๆ ในใจในการทำงานด้านอิเล็กทรอนิกส์ ที่ไม่ได้เรื่องครั้งหนึ่ง และเป็นเรื่องให้ภรรเมียยกมาพูดในแต่ละครั้ง พูดทีไรแทงใจทุกที รอวันนานไปเรื่องนี้คงเงียบลง นานๆ จะยกอุปกรณ์มาดูสักครั้งเป็นที่ระลึก
เมื่อต้นปี 2563 นี้ ภรรยาได้หยิบยกเรื่องนี้มาพูดขึ้นอีกครั้ง ผมรู้สึกว่า เรื่องนี้ยังไม่จบ และจะต้อง ทำไมมันใช้ได้ ดังนั้นผมจึงค้นหาข้อมูลใหม่อีกครั้ง พบหลายปีมานี้ QuasarARM พัฒนามาเรื่อยๆ ทั้งอุปกรณ์และ firmware มีขายทั้งอุปกรณ์สำเร็จ (ราคาก็แพงเหมือนเดิม) มีข้อข้อมูลที่ เป็นสากลมากขึ้นและละเอียดมากขึ้น และเราสามารถซื้อชิ้นส่วนอุปกรณ์ออนไลน์จาก aliexpress และที่อื่นๆ ได้ ในราคาจับต้องได้
เอาน่ามาลองกันอีกซักตั้ง สู้โว้ย
 หัวใจเป็น Arm Cortex-M3 Microcontrollers ของ STMicroelectronics ชื่อ STM32F100 ดูแล้วไม่โบราณ แบบ อนาลอค แน่นอนว่า การอัพเดทอะไร ด้วย Firmware ทันสมัยไม่หยอก
 ด้วยความบ้าบิ่น ไฟแรง และเมื่อได้วงจรมาแล้ว ก็ทำการแกะข้อมูล แปลภาษารัสเซีย ซึ่งยากมาก Google Translate ช่วยได้เล็กน้อย แปลแล้ว งงในงง ในส่วนศัพท์ทางอิเล็กทรอนิกส์ของรัสเซียกับบ้านเราต่างกัน บ้านเรา มาตรฐานสากล นี่ งงมากๆ เช่น Capacitor เขียน 15 เฉยๆ คือ 15pf 4700 คือ 4.7nf 0,033 คือ 33nf 0,1 คือ 100nf 1,0 คือ 1 uf ไม่เข้าใจจนต้อง e-mail ไปถามคุณ fandy เจ้าของ Quasar ซึ่งเค้าดูแปลกใจ เล็กน้อย และดูจะไม่อยากตอบเท่าไหร่ เข้าใจว่า เหมือนโปรขั้นเทพ คุยกับเด็กพึ่งหัด พอได้รายละเอียดซึ่งผมคิดว่าสมบูรณ์แล้ว (จริงๆ คือไม่สมบูรณ์เลย ยังมั่วอยู่มาก )
ก็เริ่มซื้ออุปกรณ์ STM32 Capacitor ,Resistor ทั้งการซื้อจากตัวต้วแทนในไทย บ้านหม้อ โชคชัย Electronics Source ฯลฯ ส่วนใหญ่จะของที่ต้องการจะไม่มี มีก็แพง เลยค้นหาจาก Online จาก Mouser Electronics ,RS-Online ,Digikey Online มีของที่ต้องการ แต่แพงและ ในช่วงหลัง มาพบ WT ออนไลน์ ในไทย พบว่าของไม่แพง
หาอุปกรณ์เสริมจาก Aliexpress,Alibaba ได้
ST-Link V2 ตะกั่วเหลว ,ทองแดงซับตะกั่ว , หัวทิปหัวแร้ง ,ที่จับ SMD (ได้มาแต่ไม่สมบูรณ์ ปัจจุบันใช้ปากคีบ)
ชิ้นส่วน ได้ LCD Blue 16×2 5V เอามา 5 ตัว
STM32F100 4 ตัว ตัวละ 0.9US 67 บาท ค่าเงิน 1 us =35.6 บาท (2015-2558) ซึ่ง STM ชุดนี้ได้เอามาใช้ใน ชุดปัจจุบันที่ทำงานได้ด้วย
น่าแปลกใจว่า ทำไมในขณะนั้นผมไม่ได้ซื้อชิ้นส่วนประกอบ ทั้ง R C ทาง Aliexpress เลย
ในส่วน PCB ประกอบ เป็นวงจร พบว่า Quasar มี ไฟล์ Lay6 ซึ่งเป็น PCB Layout มาแล้ว แต่ใช้ไม่เป็น ลองหา หา Protel มาเขียน PCB เพราะเคยใช้นานแล้ว แต่ยาก เลยหาข้อมูลพบกว่า ไฟล์ Lay6 ใช้โปรแกรม Sprint Layout 6.0 (สร้างโดย Abacom Engineer เยอรมัน) ในการ เปิดไฟล์ PCB มาแก้ โปรแกรม Sprint Layout เท่าที่ดูหลายเวป นิยมในแุถวยุโรปตะวันออกมาก ใช้ง่าย crack ได้ สามารถแปลงเป็น Gerber เพื่อส่งไปทำ PCBได้เลย และแก้ไขเล็กน้อย ได้เป็น PCB ไฟล์ ที่ต้องการ
เดือน กรกฎาคม 2558 สั่งทำ PCB Online จาก PCBway China (ตอนนั้นอยู่ Hong kong) เพราะติดต่อบ้านเรา หลายที่ทำไม่ได้ (ซีเกท เซอร์กิต) ที่ทำได้ก็แพงมาก หลายพัน มีขั้นต่ำ ได้มา 5 แผ่น 24 US 8 ร้อยกว่าบาท ค่าเงิน 1 us =35.6 บาท (2015-2558) รอประมาณ ครึ่งเดือนได้ของ ดีใจมากๆ เป็นประสบการณ์การสั่ง PCB Online ครั้งแรกๆ
เมื่อของมาเกือบครบ แล้วก็เริ่มประกอบ และเพิ่งพบว่า นรกที่แท้ทรู เพิ่งเริ่มนั่นเอง
เริ่มจากนรก ขุมแรก การบัดกรี STM31F100C8 เป็น SMD แบบ LQFP48 ขาเล็กมาก ขนาด 0.22 มม. ระยะห่างระหว่างขา0.28 มม. แรกๆ ใช้หัวแร้งธรรมดา หัวใหญ่ ปาดไม่ดี ตะกั่วติดขาเป็นทาง ต้องใช้ แถบทองแดงไว้ดูดตะกั่ว ลองใช้ตะกั่วเหลวร่วมกับที่เป่าลมร้อน ที่ซื้อมานานแล้ว แต่เป่าแล้วอุปกรณ์พัง เลยไม่ค่อยได้ใช้ อาจเพร่าะศึกษามาไม่ดี แต่มันก็มีประโยชน์ เพราะมี หัวแร้งปรับอุณหภูมิ มาด้วย ปลายแหลมเปี๊ยบ (ในตอนนั้น) และได้นำมาใช้ในเวลาต่อมา ไว้บัดกรี รวมทั้งสั่งหัวตะกั่วบัดกรีมาใหม่ แต่ดันใส่กับหัวแร้งเดิมไม่ได้ 🙁 รวมทั้งมีส่วนในความสำเร็จขั้นหนึ่งในโปรเจคแก้ตัวในปัจจุบัน (ผลงาน 2 PCB QuasarARM 0.5 วงจรทำงาน เสีย 1 PCB รอซ่อม ขา CPU) ที่จริงผมก็ซื้อ หัวแร้งมาใหม่นะ แต่ขาดันไม่ตรงกัน ต้องรอโมดิฟาย พอจะใช้ก็หาไม่เจอ เดีํยวเจอแล้วจะเอามาใช้
สิ่งที่ผมขาดไปคือแว่นขยาย ซึ่งเหมาะแก่การบัดกรีอุปกรณ์เล็กๆ ในเวลาต่อมาผมก็หาซื้อได้่
หลังจากบัดกรี STM32 ไป สาม PCB ก็ลองหาอันที่ เหมาะสมที่คิดว่ารอด และหวังว่า อันที่เหลือ จะเป่าออก แล้วบัดกรีใหม่ในเวลาอันเหมาะสม ซึ่งเวลานั้นยังไม่เคยเกิดขึ้นเลยจนถึงปัจจุบัน
ต่อมาก็บัดกรี SMD Capacitor และ Resistor ที่ได้มาตาม ยถากรรม ใหญ่บ้างเล็กบ้าง ค่าตรงมั่ง ใกล้เคียงบ้าง ลุยบัดกรีจนเกือบครบ
หลังจากลุยดึกมาเป็นสัปดาห์ก็บัดกรีเสร็จ
ก็ได้เวลา ทดลองจ่ายไฟ แล้ว พบว่าไม่ทำงาน ก็พยายามวัดโน้นนี่นั่น ไปเรื่อย นำไปสู่การบัดกรีอันที่ 2 ทดลองเชื่อมระบบ ST Link V2 กับวงจรแต่ไม่สำเร็จ
ข้อสันนิษฐานในตอนนั้นคือ ตัว Microcontroller STM32F100 อาจถูกความร้อนจากที่เป่าลมร้อนจนเสียหาย อาจต้องเปลี่ยน Microcontroller ทิ้ง
ในเวลาถัดมา การมาถึงของสิ่งใหม่ ก็ยุติทุกอย่าง นั่นคือการมาถึงของ DJI Phantom 2 Drone ทำให้โครงการเครื่องตรวจโลหะ หยุดลงชั่วคราว
มีนาคม 2559 สั่งหัวเป่าลมร้อนมาเพิ่ม เพื่อจะถอด STM32 อุปกรณ์ออก สั่ง GM328 ตัววัด Transistor ว่าเป็นแบบ MOS,NPN,PNP และวัดค่า L C R มาในตัว แต่ก็ไม่ได้ทำต่อ และหยุดโครงการไว้เพียงเท่านี้ เก็บเรื่องนี้ เป็นแผลลึกๆ ในใจในการทำงานด้านอิเล็กทรอนิกส์ ที่ไม่ได้เรื่องครั้งหนึ่ง และเป็นเรื่องให้ภรรเมียยกมาพูดในแต่ละครั้ง พูดทีไรแทงใจทุกที รอวันนานไปเรื่องนี้คงเงียบลง นานๆ จะยกอุปกรณ์มาดูสักครั้งเป็นที่ระลึก
เมื่อต้นปี 2563 นี้ ภรรยาได้หยิบยกเรื่องนี้มาพูดขึ้นอีกครั้ง ผมรู้สึกว่า เรื่องนี้ยังไม่จบ และจะต้อง ทำไมมันใช้ได้ ดังนั้นผมจึงค้นหาข้อมูลใหม่อีกครั้ง พบหลายปีมานี้ QuasarARM พัฒนามาเรื่อยๆ ทั้งอุปกรณ์และ firmware มีขายทั้งอุปกรณ์สำเร็จ (ราคาก็แพงเหมือนเดิม) มีข้อข้อมูลที่ เป็นสากลมากขึ้นและละเอียดมากขึ้น และเราสามารถซื้อชิ้นส่วนอุปกรณ์ออนไลน์จาก aliexpress และที่อื่นๆ ได้ ในราคาจับต้องได้
เอาน่ามาลองกันอีกซักตั้ง สู้โว้ย
ด้วยความบ้าบิ่น ไฟแรง และเมื่อได้วงจรมาแล้ว ก็ทำการแกะข้อมูล แปลภาษารัสเซีย ซึ่งยากมาก Google Translate ช่วยได้เล็กน้อย แปลแล้ว งงในงง ในส่วนศัพท์ทางอิเล็กทรอนิกส์ของรัสเซียกับบ้านเราต่างกัน บ้านเรา มาตรฐานสากล นี่ งงมากๆ เช่น Capacitor เขียน 15 เฉยๆ คือ 15pf 4700 คือ 4.7nf 0,033 คือ 33nf 0,1 คือ 100nf 1,0 คือ 1 uf ไม่เข้าใจจนต้อง e-mail ไปถามคุณ fandy เจ้าของ Quasar ซึ่งเค้าดูแปลกใจ เล็กน้อย และดูจะไม่อยากตอบเท่าไหร่ เข้าใจว่า เหมือนโปรขั้นเทพ คุยกับเด็กพึ่งหัด พอได้รายละเอียดซึ่งผมคิดว่าสมบูรณ์แล้ว (จริงๆ คือไม่สมบูรณ์เลย ยังมั่วอยู่มาก )
ก็เริ่มซื้ออุปกรณ์ STM32 Capacitor ,Resistor ทั้งการซื้อจากตัวต้วแทนในไทย บ้านหม้อ โชคชัย Electronics Source ฯลฯ ส่วนใหญ่จะของที่ต้องการจะไม่มี มีก็แพง เลยค้นหาจาก Online จาก Mouser Electronics ,RS-Online ,Digikey Online มีของที่ต้องการ แต่แพงและ ในช่วงหลัง มาพบ WT ออนไลน์ ในไทย พบว่าของไม่แพง
หาอุปกรณ์เสริมจาก Aliexpress,Alibaba ได้
ST-Link V2 ตะกั่วเหลว ,ทองแดงซับตะกั่ว , หัวทิปหัวแร้ง ,ที่จับ SMD (ได้มาแต่ไม่สมบูรณ์ ปัจจุบันใช้ปากคีบ)
ชิ้นส่วน ได้ LCD Blue 16×2 5V เอามา 5 ตัว
STM32F100 4 ตัว ตัวละ 0.9US 67 บาท ค่าเงิน 1 us =35.6 บาท (2015-2558) ซึ่ง STM ชุดนี้ได้เอามาใช้ใน ชุดปัจจุบันที่ทำงานได้ด้วย
น่าแปลกใจว่า ทำไมในขณะนั้นผมไม่ได้ซื้อชิ้นส่วนประกอบ ทั้ง R C ทาง Aliexpress เลย
ในส่วน PCB ประกอบ เป็นวงจร พบว่า Quasar มี ไฟล์ Lay6 ซึ่งเป็น PCB Layout มาแล้ว แต่ใช้ไม่เป็น ลองหา หา Protel มาเขียน PCB เพราะเคยใช้นานแล้ว แต่ยาก เลยหาข้อมูลพบกว่า ไฟล์ Lay6 ใช้โปรแกรม Sprint Layout 6.0 (สร้างโดย Abacom Engineer เยอรมัน) ในการ เปิดไฟล์ PCB มาแก้ โปรแกรม Sprint Layout เท่าที่ดูหลายเวป นิยมในแุถวยุโรปตะวันออกมาก ใช้ง่าย crack ได้ สามารถแปลงเป็น Gerber เพื่อส่งไปทำ PCBได้เลย และแก้ไขเล็กน้อย ได้เป็น PCB ไฟล์ ที่ต้องการ
เดือน กรกฎาคม 2558 สั่งทำ PCB Online จาก PCBway China (ตอนนั้นอยู่ Hong kong) เพราะติดต่อบ้านเรา หลายที่ทำไม่ได้ (ซีเกท เซอร์กิต) ที่ทำได้ก็แพงมาก หลายพัน มีขั้นต่ำ ได้มา 5 แผ่น 24 US 8 ร้อยกว่าบาท ค่าเงิน 1 us =35.6 บาท (2015-2558) รอประมาณ ครึ่งเดือนได้ของ ดีใจมากๆ เป็นประสบการณ์การสั่ง PCB Online ครั้งแรกๆ
เมื่อของมาเกือบครบ แล้วก็เริ่มประกอบ และเพิ่งพบว่า นรกที่แท้ทรู เพิ่งเริ่มนั่นเอง
เริ่มจากนรก ขุมแรก การบัดกรี STM31F100C8 เป็น SMD แบบ LQFP48 ขาเล็กมาก ขนาด 0.22 มม. ระยะห่างระหว่างขา0.28 มม. แรกๆ ใช้หัวแร้งธรรมดา หัวใหญ่ ปาดไม่ดี ตะกั่วติดขาเป็นทาง ต้องใช้ แถบทองแดงไว้ดูดตะกั่ว ลองใช้ตะกั่วเหลวร่วมกับที่เป่าลมร้อน ที่ซื้อมานานแล้ว แต่เป่าแล้วอุปกรณ์พัง เลยไม่ค่อยได้ใช้ อาจเพร่าะศึกษามาไม่ดี แต่มันก็มีประโยชน์ เพราะมี หัวแร้งปรับอุณหภูมิ มาด้วย ปลายแหลมเปี๊ยบ (ในตอนนั้น) และได้นำมาใช้ในเวลาต่อมา ไว้บัดกรี รวมทั้งสั่งหัวตะกั่วบัดกรีมาใหม่ แต่ดันใส่กับหัวแร้งเดิมไม่ได้ 🙁 รวมทั้งมีส่วนในความสำเร็จขั้นหนึ่งในโปรเจคแก้ตัวในปัจจุบัน (ผลงาน 2 PCB QuasarARM 0.5 วงจรทำงาน เสีย 1 PCB รอซ่อม ขา CPU) ที่จริงผมก็ซื้อ หัวแร้งมาใหม่นะ แต่ขาดันไม่ตรงกัน ต้องรอโมดิฟาย พอจะใช้ก็หาไม่เจอ เดีํยวเจอแล้วจะเอามาใช้
สิ่งที่ผมขาดไปคือแว่นขยาย ซึ่งเหมาะแก่การบัดกรีอุปกรณ์เล็กๆ ในเวลาต่อมาผมก็หาซื้อได้่
หลังจากบัดกรี STM32 ไป สาม PCB ก็ลองหาอันที่ เหมาะสมที่คิดว่ารอด และหวังว่า อันที่เหลือ จะเป่าออก แล้วบัดกรีใหม่ในเวลาอันเหมาะสม ซึ่งเวลานั้นยังไม่เคยเกิดขึ้นเลยจนถึงปัจจุบัน
ต่อมาก็บัดกรี SMD Capacitor และ Resistor ที่ได้มาตาม ยถากรรม ใหญ่บ้างเล็กบ้าง ค่าตรงมั่ง ใกล้เคียงบ้าง ลุยบัดกรีจนเกือบครบ
หลังจากลุยดึกมาเป็นสัปดาห์ก็บัดกรีเสร็จ
ก็ได้เวลา ทดลองจ่ายไฟ แล้ว พบว่าไม่ทำงาน ก็พยายามวัดโน้นนี่นั่น ไปเรื่อย นำไปสู่การบัดกรีอันที่ 2 ทดลองเชื่อมระบบ ST Link V2 กับวงจรแต่ไม่สำเร็จ
ข้อสันนิษฐานในตอนนั้นคือ ตัว Microcontroller STM32F100 อาจถูกความร้อนจากที่เป่าลมร้อนจนเสียหาย อาจต้องเปลี่ยน Microcontroller ทิ้ง
ในเวลาถัดมา การมาถึงของสิ่งใหม่ ก็ยุติทุกอย่าง นั่นคือการมาถึงของ DJI Phantom 2 Drone ทำให้โครงการเครื่องตรวจโลหะ หยุดลงชั่วคราว
มีนาคม 2559 สั่งหัวเป่าลมร้อนมาเพิ่ม เพื่อจะถอด STM32 อุปกรณ์ออก สั่ง GM328 ตัววัด Transistor ว่าเป็นแบบ MOS,NPN,PNP และวัดค่า L C R มาในตัว แต่ก็ไม่ได้ทำต่อ และหยุดโครงการไว้เพียงเท่านี้ เก็บเรื่องนี้ เป็นแผลลึกๆ ในใจในการทำงานด้านอิเล็กทรอนิกส์ ที่ไม่ได้เรื่องครั้งหนึ่ง และเป็นเรื่องให้ภรรเมียยกมาพูดในแต่ละครั้ง พูดทีไรแทงใจทุกที รอวันนานไปเรื่องนี้คงเงียบลง นานๆ จะยกอุปกรณ์มาดูสักครั้งเป็นที่ระลึก
เมื่อต้นปี 2563 นี้ ภรรยาได้หยิบยกเรื่องนี้มาพูดขึ้นอีกครั้ง ผมรู้สึกว่า เรื่องนี้ยังไม่จบ และจะต้อง ทำไมมันใช้ได้ ดังนั้นผมจึงค้นหาข้อมูลใหม่อีกครั้ง พบหลายปีมานี้ QuasarARM พัฒนามาเรื่อยๆ ทั้งอุปกรณ์และ firmware มีขายทั้งอุปกรณ์สำเร็จ (ราคาก็แพงเหมือนเดิม) มีข้อข้อมูลที่ เป็นสากลมากขึ้นและละเอียดมากขึ้น และเราสามารถซื้อชิ้นส่วนอุปกรณ์ออนไลน์จาก aliexpress และที่อื่นๆ ได้ ในราคาจับต้องได้
เอาน่ามาลองกันอีกซักตั้ง สู้โว้ย
 +
+