nodemcu 0.9 am2305 ds18b20 thingspeak

// www.arduinesp.com
//
// Plot DTH11 data on thingspeak.com using an ESP8266
// April 11 2015
// Author: Jeroen Beemster
// Website: www.arduinesp.com
// ใช้กับ กล่อง วัดอุณหภูมิที่บ้าน
// 20-3-2017 ใช้งานครั้งแรก DHT22
// 19-5-2017 เพิ่ม DS18B20
// 18-12-2017 ซ่อมครั้งที่ 1 เปลี่ยน DHT22 เป็น AM2305
// 26-2-2018 เปลี่ยน accesspoint ใหม่ ตั้งรหัสใหม่ เปลี่ยน thingspeak acc ใหม่
#include <DHT.h>
#include <ESP8266WiFi.h>
#include <OneWire.h>
#include <DallasTemperature.h>
#include “ThingSpeak.h”

// replace with your channel’s thingspeak API key,
unsigned long myChannelNumber = xxxxxx;
const char * myWriteAPIKey = “xxxxxxxxxxxxxx”;

const char* ssid = “SMART_xxx”;
const char* password = “xxxxxxxxxxx”;

#define DHTPIN1 D1 // d0 dht22 ext
// #define DHTPIN2 D2 // d1 dht22 mushroom
DHT dht1(DHTPIN1,DHT22,15);
// DHT dht2(DHTPIN2,DHT22,15);
#define sensorPin D2 // Data wire is plugged into pin D3 on NodeMCU
OneWire oneWire(sensorPin); // Setup the oneWire Sensor
DallasTemperature DS18B20(&oneWire); // Pass reference to Dallas Temperature.
WiFiClient client;

ADC_MODE(ADC_VCC);
// int vcc;
void setup() {
Serial.begin(115200);
delay(10);
dht1.begin();
//dht2.begin();
WiFi.begin(ssid, password);

Serial.println();
Serial.println();
Serial.print(“Connecting to “);
Serial.println(ssid);

WiFi.begin(ssid, password);

while (WiFi.status() != WL_CONNECTED) {
delay(500);
Serial.print(“.”);
}
Serial.println(“”);
Serial.println(“WiFi connected”);
Serial.println(“IP address: “);
Serial.println(WiFi.localIP());
ThingSpeak.begin(client);
}

void loop() {

float h1 = dht1.readHumidity();
float t1 = dht1.readTemperature();
float vcc = 0.00f;
vcc = ESP.getVcc()/1024.00f;
// uint32_t vcc = ESP.getVcc()/1000.0;
DS18B20.requestTemperatures();
float t2 = DS18B20.getTempCByIndex(0);
//if (isnan(h1) || isnan(t1) ||isnan(h2) || isnan(t2)) {
if (isnan(h1) || isnan(t1) ) {
Serial.println(“Failed to read from EXT DHT sensor 1 !”);
//return;
t1=0;
h1=0;
}
else if (isnan(t2) ) {
Serial.println(“Failed to read from DS18B20 mushroom sensor 2 !”);
//return;
t2=0;
//h2=0;
}
Serial.print(“Temperature 1: “);
Serial.print(t1);
Serial.print(” C Humidity 1: “);
Serial.print(h1);
Serial.print(” % Voltage : “);
Serial.print(vcc);
Serial.print(” V MushRoom Temperature 2: “);
Serial.print(t2);
Serial.println(” C”);
//Serial.print(” C MushRoom Humidity 2: “);
//Serial.print(h2);
//Serial.println(“% send to Thingspeak”);

ThingSpeak.setField(1,t1);
ThingSpeak.setField(2,h1);
ThingSpeak.setField(3,vcc);
ThingSpeak.setField(4,t2);
ThingSpeak.writeFields(myChannelNumber, myWriteAPIKey);
Serial.println(“Waiting”);
delay(20000);
// ThingSpeak will only accept updates every 15 seconds.
// delay 1 minitue delay 1000=1sec

client.stop();

Serial.println(“Wifi Disconnect”);
WiFi.disconnect();
//delay(60000);
delay(100);
//โดย 1,000,000 microseconds = 1 second)
Serial.println(“”);
Serial.println(“Deep Sleep 5 min”);
// deep sleep 1 min
//ESP.deepSleep(60 * 1000000, WAKE_RF_DEFAULT);
//deep sleep 5 min
ESP.deepSleep(360 * 1000000, WAKE_RF_DEFAULT);
//ESP.deepSleep(5*60 * 1000000);
//node.dsleep(60 * 1000000);
delay(500); // wait for deep sleep to happen
}

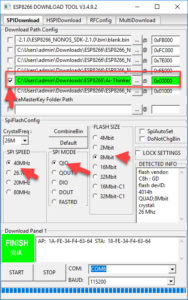
ESP-01 AT Firmware AI-Thinker

http://wiki.ai-thinker.com/_media/esp8266/ai-thinker_esp8266_at_firmware_dout_v1.5.4.1-a_20171130.rar


Ai-Thinker_ESP8266_DOUT_8Mbit_v1.5.4.1-a_20171130.bin


esp-01-at-ai-thinker-firmware

Youtube Auto for android auto

  1. download android auto    https://www.apkmirror.com/apk/google-inc/android-auto/android-auto-2-8-5745-release/android-auto-maps-media-messaging-voice-2-8-574513-release-android-apk-download/
  2. Youtube  Auto http://www.thekirankumar.com/blog/2017/12/29/play-youtube-video-android-auto-app/

ESP32 MircoPython Install

https://www.python.org/downloads/

download ตัว python-2.7.14 ที่ https://www.python.org/ftp/python/2.7.14/python-2.7.14.msi

ติดตั้ง

โปรแกรมจะสร้าง folder ที่ c:\python27

cmd ออก command prompt

พิมพ์ cd\python27  แล้ว Enter

cd Scripts

pip install esptool    //ติดตั้ง esptool

pip install adafruit-ampy

esptool.py –port COM3 flash_id   //ตรวจสอบ การเชื่อมต่อ

esptool.py –port COM3 erase_flash //ลบ flash ของเดิมออก รอติดตั้ง micropython

สลับไป เปิดเวป https://www.micropython.org/downloads/#esp32

download firmware http://micropython.org/resources/firmware/esp32-20171224-v1.9.3-217-g5de064fb.bin

เมื่อได้ไฟล์ esp32-20171224-v1.9.3-217-g5de064fb.bin มาแล้ว

copy ไปไว้ใน c:\python27 แล้ว rename เป็น esp.bin

กลับไปที่ cmd พิมพ์

esptool.py –chip esp32 –port COM3 write_flash -z 0x1000 c:\python27\esp.bin  เพื่อ upload firmware ใส่ใน esp32

เห็นหน้าตาคล้ายจอแสดงผล ในตอน compile esp32 มากเลย

หลังจาก flash สำเร็จ ลองติดต่อโดยใช้ putty

เลือก Serial COM3 115200

เท่านี้ก็เรียบโร้ย

อ้อ ลืมตัว editor


download มาแล้วใส่ใน C:\Program Files\ESPlorer

ส่ง shortcut ESPlorer.bat มาบนจอ เท่านี้ก้ใช้ได้


ที่มา:https://www.youtube.com/watch?v=ay2yuGId7Ag


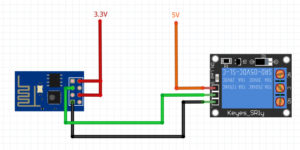
ESP8266 ESP-01 Blynk Virtual port Relay

esp-01-relay

/**************************************************************
* Blynk is a platform with iOS and Android apps to control
* Arduino, Raspberry Pi and the likes over the Internet.
* You can easily build graphic interfaces for all your
* projects by simply dragging and dropping widgets.
*
* Downloads, docs, tutorials: http://www.blynk.cc
* Sketch generator: http://examples.blynk.cc
* Blynk community: http://community.blynk.cc
* Social networks: http://www.fb.com/blynkapp
* http://twitter.com/blynk_app
*
* Blynk library is licensed under MIT license
* This example code is in public domain.
*
**************************************************************
* This example runs directly on ESP8266 chip.
*
* Note: This requires ESP8266 support package:
* https://github.com/esp8266/Arduino
*
* Please be sure to select the right ESP8266 module
* in the Tools -> Board menu!
*
* Change WiFi ssid, pass, and Blynk auth token to run 🙂
*
**************************************************************/

#define BLYNK_PRINT Serial // Comment this out to disable prints and save space
#include <ESP8266WiFi.h>
#include <BlynkSimpleEsp8266.h>

// You should get Auth Token in the Blynk App.
// Go to the Project Settings (nut icon).
char auth[] = “xxxxxxxxxxxxxxxxxxxxxxxxxx”;

// Your WiFi credentials.
// Set password to “” for open networks.
char ssid[] = “yyyyyyyyyyyyyyy”;
char pass[] = “zzzzzzzzzz”;

void setup()
{
Serial.begin(9600);
pinMode(0, OUTPUT);
pinMode(2, OUTPUT);
Blynk.begin(auth, ssid, pass);
}
BLYNK_WRITE(V1)
{
int i=param.asInt();
if (i==1)
{
delay(300);
digitalWrite(0, HIGH);
digitalWrite(2, HIGH);
delay(1750); // delay 1000 = 1 sec
digitalWrite(0, LOW);
digitalWrite(2, LOW);
}
else
{
digitalWrite(0, LOW);
digitalWrite(2, LOW);
}
}

void loop()
{
Blynk.run();
}


credit:http://docs.blynk.cc/#blynk-main-operations-get-data-from-hardware

https://community.blynk.cc/t/blynk-virtual-pin-blynk-write/7001/3

ESP8266 ESP-01 Relay Blynk #1

esp-01-relay

/**************************************************************
* Blynk is a platform with iOS and Android apps to control
* Arduino, Raspberry Pi and the likes over the Internet.
* You can easily build graphic interfaces for all your
* projects by simply dragging and dropping widgets.
*
* Downloads, docs, tutorials: http://www.blynk.cc
* Sketch generator: http://examples.blynk.cc
* Blynk community: http://community.blynk.cc
* Social networks: http://www.fb.com/blynkapp
* http://twitter.com/blynk_app
*
* Blynk library is licensed under MIT license
* This example code is in public domain.
*
**************************************************************
* This example runs directly on ESP8266 chip.
*
* Note: This requires ESP8266 support package:
* https://github.com/esp8266/Arduino
*
* Please be sure to select the right ESP8266 module
* in the Tools -> Board menu!
*
* Change WiFi ssid, pass, and Blynk auth token to run 🙂
*
**************************************************************/

#define BLYNK_PRINT Serial // Comment this out to disable prints and save space
#include <ESP8266WiFi.h>
#include <BlynkSimpleEsp8266.h>

// You should get Auth Token in the Blynk App.
// Go to the Project Settings (nut icon).
char auth[] = “xxxxxxxxxxxxxxxxxxxxxxxxxxxx”;

// Your WiFi credentials.
// Set password to “” for open networks.
char ssid[] = “yyyyyyy”;
char pass[] = “zzzzzzzzz”;

void setup()
{
Serial.begin(9600);
Blynk.begin(auth, ssid, pass);
}

void loop()
{
Blynk.run();
}

NODEMCU ESP8266 DHT22 AM2305 DS18B20 Thingspeak

// www.arduinesp.com
//
// Plot DTH11 data on thingspeak.com using an ESP8266
// April 11 2015
// Author: Jeroen Beemster
// Website: www.arduinesp.com
// ใช้กับ กล่อง วัดอุณหภูมิที่บ้าน
// 20-3-2017 ใช้งานครั้งแรก DHT22
// 19-5-2017 เพิ่ม DS18B20
// 18-12-2017 ซ่อมครั้งที่ 1 เปลี่ยน DHT22 เป็น AM2305

#include <DHT.h>
#include <ESP8266WiFi.h>
#include <OneWire.h>
#include <DallasTemperature.h>

// replace with your channel’s thingspeak API key,
String apiKey = “WXXXXXXXXX”;
const char* ssid = “AP_xxxx”;
const char* password = “1xxxxxxxx”;

const char* server = “api.thingspeak.com”;
#define DHTPIN1 D1 // d0 dht22 ext
// #define DHTPIN2 D2 // d1 dht22 mushroom
DHT dht1(DHTPIN1,DHT22,15);
// DHT dht2(DHTPIN2,DHT22,15);
#define sensorPin D2 // Data wire is plugged into pin D3 on NodeMCU
OneWire oneWire(sensorPin); // Setup the oneWire Sensor
DallasTemperature DS18B20(&oneWire); // Pass reference to Dallas Temperature.
WiFiClient client;

ADC_MODE(ADC_VCC);
// int vcc;
void setup() {
Serial.begin(115200);
delay(10);
dht1.begin();
//dht2.begin();
WiFi.begin(ssid, password);

Serial.println();
Serial.println();
Serial.print(“Connecting to “);
Serial.println(ssid);

WiFi.begin(ssid, password);

while (WiFi.status() != WL_CONNECTED) {
delay(500);
Serial.print(“.”);
}
Serial.println(“”);
Serial.println(“WiFi connected”);

}

void loop() {

float h1 = dht1.readHumidity();
float t1 = dht1.readTemperature();
float vcc = 0.00f;
vcc = ESP.getVcc()/1024.00f;
// uint32_t vcc = ESP.getVcc()/1000.0;
DS18B20.requestTemperatures();
float t2 = DS18B20.getTempCByIndex(0);
//float h2 = 0; // can’t read ds18b20 humidity
//float h2 = dht2.readHumidity();
//float t2 = dht2.readTemperature();
//if (isnan(h1) || isnan(t1) ||isnan(h2) || isnan(t2)) {
if (isnan(h1) || isnan(t1) ) {
Serial.println(“Failed to read from EXT DHT sensor 1 !”);
//return;
t1=0;
h1=0;
}
else if (isnan(t2) ) {
Serial.println(“Failed to read from DS18B20 mushroom sensor 2 !”);
//return;
t2=0;
//h2=0;
}

if (client.connect(server,80)) { // “184.106.153.149” or api.thingspeak.com
String postStr = apiKey;
postStr +=”&field1=”;
postStr += String(t1);
postStr +=”&field2=”;
postStr += String(h1);
postStr +=”&field3=”;
postStr += String(vcc);
postStr +=”&field4=”;
postStr += String(t2);
//postStr +=”&field5=”;
//postStr += String(h2);
postStr += “\r\n\r\n”;

client.print(“POST /update HTTP/1.1\n”);
client.print(“Host: api.thingspeak.com\n”);
client.print(“Connection: close\n”);
client.print(“X-THINGSPEAKAPIKEY: “+apiKey+”\n”);
client.print(“Content-Type: application/x-www-form-urlencoded\n”);
client.print(“Content-Length: “);
client.print(postStr.length());
client.print(“\n\n”);
client.print(postStr);
Serial.print(“Temperature 1: “);
Serial.print(t1);
Serial.print(” C Humidity 1: “);
Serial.print(h1);
Serial.print(” % Voltage : “);
Serial.print(vcc);
Serial.print(” V MushRoom Temperature 2: “);
Serial.print(t2);
Serial.println(” C”);
//Serial.print(” C MushRoom Humidity 2: “);
//Serial.print(h2);
//Serial.println(“% send to Thingspeak”);
}
client.stop();

Serial.println(“Waiting”);
// thingspeak needs minimum 15 sec delay between updates
// delay 1 minitue delay 1000=1sec
Serial.println(“Wifi Disconnect”);
WiFi.disconnect();
//delay(60000);
delay(100);
//โดย 1,000,000 microseconds = 1 second)
//node.dsleep(60 * 1000000)
Serial.println(“”);
Serial.println(“Deep Sleep 5 min”);
// deep sleep 1 min
//ESP.deepSleep(60 * 1000000, WAKE_RF_DEFAULT);
//deep sleep 5 min
ESP.deepSleep(360 * 1000000, WAKE_RF_DEFAULT);
//ESP.deepSleep(5*60 * 1000000);
//node.dsleep(60 * 1000000);
delay(500); // wait for deep sleep to happen
}
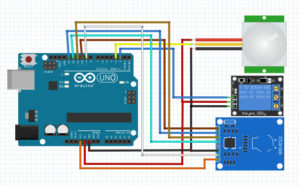
Arduino + PIR + RFID + Relay

arduino-rfid_rc522-pir_hc-sr501-1ch_relay

อุปกรณ์

  • Arduino UNO R3 SMD
  • PIR Pyroelectric Infrared PIR Motion Sensor HC-SR501
  • RFID 13.56 MHz RC522 และ Tag
  • 1 Ch Relay 5V

การทำงาน  อ่านความเคลื่อนไหวจาก PIR แล้ว มาอ่านค่า Tag จาก RFID  หาก ตรงกัน ให้ Relay ทำงาน

ถ้าเอา tag ผ่าน RFID โดยไม่มีการเคลื่อนไหว จะไม่ทำงาน

ระยะ PIR


#include <SPI.h>
#include <RFID.h>
// ส่วนของ rfid
#define SS_PIN 10
#define RST_PIN 9
RFID rfid(SS_PIN,RST_PIN);
int serNum[5];
int cards[][5] = {
{22,227,22,203,40}
};
bool access = false;

int ledPin1= 7;
int rfidPPin1= 6;
int inputPin= 3;
int relay=2;
void setup(){
Serial.begin(9600);
pinMode(ledPin1, OUTPUT);
pinMode(inputPin, INPUT);
pinMode(relay, OUTPUT);
SPI.begin();
rfid.init();
}

void loop(){
int value= digitalRead(inputPin);

if (value == HIGH)
{
digitalWrite(ledPin1, HIGH);
Serial.println(” LED ON”);

//delay(100) ;
}else
{
digitalWrite(ledPin1, LOW);
Serial.println(” LED OFF”);
}
// rfid.isCard();
//
// while(digitalRead(7) == HIGH) ****** I try to use with while and if but the loop continue to run without the input signal condition even when the input wire is disconnected.

if(rfid.isCard()&& (value == HIGH)){
// if(rfid.isCard()){

if(rfid.readCardSerial()){
Serial.print(rfid.serNum[0]);
Serial.print(” “);
Serial.print(rfid.serNum[1]);
Serial.print(” “);
Serial.print(rfid.serNum[2]);
Serial.print(” “);
Serial.print(rfid.serNum[3]);
Serial.print(” “);
Serial.print(rfid.serNum[4]);
Serial.println(“”);

for(int x = 0; x < sizeof(cards); x++) {
for(int i = 0; i < sizeof(rfid.serNum); i++ ) {
if(rfid.serNum[i] != cards[x][i]) {
access = false;
break;
} else {
access = true;
}
}
if(access) break;
}

}

if(access);
Serial.println(“Get In—>”);
// while(digitalRead(7) == HIGH);
digitalWrite(relay, HIGH);
delay(500);
}else {
Serial.println(“You Blocked(-)”);
digitalWrite(relay, LOW);
delay(100);
}

rfid.halt();
}

ที่มา : http://forum.arduino.cc/index.php?topic=407081.0  แก้ไขโดย PualS

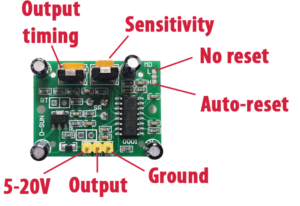
Arduino Uno + PIR Sensor

hc-sr501-labelled-althc-sr501

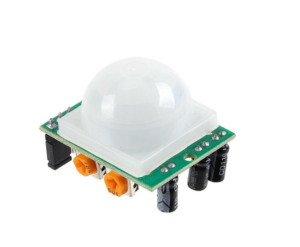
PIR Motion Sensor Module (HC-SR501)

จำนวน 1 ตัว

ตรวจจับความเคลื่อนไหว
Color: White + Green
Dimension: 3.2cm x 2.4cm x 1.8cm (approx)
Infrared sensor with control circuit board
The sensitivity and holding time can be adjusted
Working Voltage Range: DC 4.5V- 20V
Current drain:<60uA
Voltage Output: High/Low level signal:3.3V TTL output
Detection distance: 3–7M(can be adjusted)
Detection range: <140°
Delay time: 5-200S(can be adjusted, default 5s +-3%)
Blockade time: 2.5 S (default)
Trigger: L: Non-repeatable trigger H: Repeat Trigger (default)
Work temperature:-20-+80°C
Trigger Method: L unrepeatable trigger / H repeatable trigger

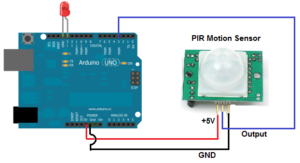
arduino-pir


int ledPin= 13;
int inputPin= 3;

void setup(){
pinMode(ledPin, OUTPUT);
pinMode(inputPin, INPUT);
}

void loop(){
int value= digitalRead(inputPin);

if (value == HIGH)
{
digitalWrite(ledPin, HIGH);
delay(1000) ;
}

else
{
digitalWrite(ledPin, LOW);
}
}


ที่มา:https://www.arduinoall.com/product/29/pir-hc-sr501-%E0%B9%80%E0%B8%8B%E0%B8%99%E0%B9%80%E0%B8%8B%E0%B8%AD%E0%B8%A3%E0%B9%8C%E0%B8%95%E0%B8%A3%E0%B8%A7%E0%B8%88%E0%B8%88%E0%B8%B1%E0%B8%9A%E0%B8%84%E0%B8%A7%E0%B8%B2%E0%B8%A1%E0%B9%80%E0%B8%84%E0%B8%A5%E0%B8%B7%E0%B9%88%E0%B8%AD%E0%B8%99%E0%B9%84%E0%B8%AB%E0%B8%A7-motion-sensor-module-hc-sr501

esp8266 Deep Sleep Max

esp8266 Deep sleep โดยต่อ ขา GPIO16 (D0) ไปขา Reset

node.dsleep(15 * 60 * 1000000)

โดย 1,000,000 ไมโครวินาที (microseconds) = 1 วินาที (second) โดยตัวอย่างจะ deep sleep ได้ 15 นาที

การตั้งค่า  โดยทฤษฎี จะสามารถทำ deep sleep ได้  4,294,967,295, which is about 71 minutes แต่

เนื่องจากข้อจำกัด จะทำได้แค่ 35 นาที (2,100,000 milliseconds)