กู้ไฟล์จาก System Volume Information

Windows Explorer

Tool

folder Options

View

ติ๊ก Show Hidden files กับ Hide protected operting system

System Volume Information

ถ้าเข้าไม่ได้ ติด Access in denied

ไปแก้ Security ให้ permission เป็น Administrators เพราะของเดิมมีแต่ System

อีกตัวคือ แก้ Auditing ให้ Administrators Full Contrtol

อย่าลิม Replace all child object ทั้งคู่

เมื่อเข้าไปแล้ว สามารถเข้าไปดู ใน folder ต่างๆ ว่ามี file ที่ต้องการอยู่หรือไม่ ชื่อจะไม่เหมือนเดิมแต่ ext จะแสดงอยู่


ดู product key Windows

1.Produkey โดย nirsoft  http://www.nirsoft.net/utils/product_cd_key_viewer.html

รุ่น ที่สามารถดูได้

  • Microsoft Windows 98/ME
  • Microsoft Windows 2000
  • Microsoft Windows NT
  • Microsoft Windows XP
  • Microsoft Windows Vista
  • Microsoft Windows Server 2003
  • Microsoft Windows 7 (Doesn’t work with Microsoft Volume Licensing)
  • Microsoft Windows 8 (Doesn’t work with Microsoft Volume Licensing)
  • Microsoft Windows 10 (Doesn’t work with all types of licenses)
  • Microsoft Office 2000 (Only ProductID is displayed)
  • Microsoft Office 2003
  • Microsoft Office 2007
  • Microsoft Office 2010
  • Microsoft SQL Server 2000
  • Microsoft SQL Server 2005
  • Microsoft Exchange Server 2000
  • Microsoft Exchange Server 2003
  • Visual Studio
  • Some of the Adobe and Autodesk products

2. WMIC

  • Start ช่อง Search พิมพ์ Command Prompt คลิ๊กขวาเลือก Run As Administrator หรือ ปุ่ม Windows + X แล้วกด A
  • ที่ Command Prompt พิมพ์
  • wmic path softwarelicensingservice get OA3xOriginalProductKey แล้ว Enter

3. Power Shell

  • ที่ PowerShell
  • powershell “(Get-WmiObject -query ‘select * from SoftwareLicensingService’).OA3xOriginalProductKey”


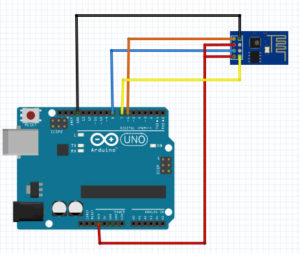
Arduino Uno + ESP-01 AT Command #1

arduino-uno-esp-01-at-comm

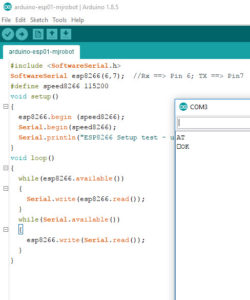
#include <SoftwareSerial.h>
SoftwareSerial esp8266(6,7); //Rx ==> Pin 6; TX ==> Pin7
#define speed8266 115200
void setup()
{
esp8266.begin (speed8266);
Serial.begin(speed8266);
Serial.println(“ESP8266 Setup test – use AT commands”);
}
void loop()
{
while(esp8266.available())
{
Serial.write(esp8266.read());
}
while(Serial.available())
{
esp8266.write(Serial.read());
}
}

arduino-uno-esp-01-at-command-test

+++++

// cr:http://www.instructables.com/id/Using-ESP-01-and-Arduino-UNO/
// cr:https://create.arduino.cc/projecthub/mjrobot/iot-made-easy-w-uno-esp-01-thingspeak-mit-app-inventor-da6a50
#include <SoftwareSerial.h>
SoftwareSerial esp8266(6,7); //Rx ==> Pin 6; TX ==> Pin7
#define speed8266 115200
#define TIMEOUT 5000 // mS
void setup()
{
esp8266.begin (speed8266);
Serial.begin(speed8266);
// send command connect wifi
SendCommand(“AT+RST”, “Ready”);
delay(5000);
SendCommand(“AT+CWMODE=1″,”OK”);

// sss=ssid ,ppp=password
SendCommand(“AT+CWJAP=\”sss\”,\”ppp\””, “OK”);
Serial.println(“ESP8266 Setup test – use AT commands”);
}
void loop()
{
while(esp8266.available())
{
Serial.write(esp8266.read());
}
while(Serial.available())
{
esp8266.write(Serial.read());
}
}
boolean SendCommand(String cmd, String ack){
esp8266.println(cmd); // Send “AT+” command to module
if (!echoFind(ack)) // timed out waiting for ack string
return true; // ack blank or ack found
}

boolean echoFind(String keyword){
byte current_char = 0;
byte keyword_length = keyword.length();
long deadline = millis() + TIMEOUT;
while(millis() < deadline){
if (esp8266.available()){
char ch = esp8266.read();
Serial.write(ch);
if (ch == keyword[current_char])
if (++current_char == keyword_length){
Serial.println();
return true;
}
}
}
return false; // Timed out
}

credit:https://create.arduino.cc/projecthub/mjrobot/iot-made-easy-w-uno-esp-01-thingspeak-mit-app-inventor-da6a50

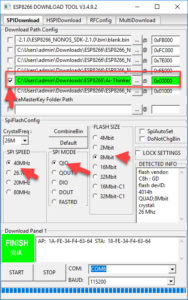
ESP-01 AT Firmware AI-Thinker

http://wiki.ai-thinker.com/_media/esp8266/ai-thinker_esp8266_at_firmware_dout_v1.5.4.1-a_20171130.rar


Ai-Thinker_ESP8266_DOUT_8Mbit_v1.5.4.1-a_20171130.bin


esp-01-at-ai-thinker-firmware

Remember The Name – Fort Minor

You ready?! Let’s go!
Yeah, for those of you that want to know what we’re all about
It’s like this y’all (c’mon!)

[Chorus:]
This is ten percent luck, twenty percent skill
Fifteen percent concentrated power of will
Five percent pleasure, fifty percent pain
And a hundred percent reason to remember the name!

Mike! – He doesn’t need his name up in lights
He just wants to be heard whether it’s the beat or the mic
He feels so unlike everybody else, alone
In spite of the fact that some people still think that they know him
But fuck em, he knows the code
It’s not about the salary
It’s all about reality and making some noise
Making the story – making sure his clique stays up
That means when he puts it down Tak’s picking it up! Let’s go!

Who the hell is he anyway?
He never really talks much
Never concerned with status but still leaving them star struck
Humbled through opportunities given despite the fact
That many misjudge him because he makes a living from writing raps
Put it together himself, now the picture connects
Never asking for someone’s help, or to get some respect
He’s only focused on what he wrote, his will is beyond reach
And now it all unfolds, the skill of an artist

This is twenty percent skill
Eighty percent fear
Be a hundred percent clear cause Ryu is ill
Who would’ve thought he’d be the one to set the west in flames
Then I heard him wreck it with The Crystal Method, “Name Of The Game”
Came back dropped Megadef, took em to church
I like bleach man, why you had the stupidest verse?
This dude is the truth, now everybody’s giving him guest spots
His stock’s through the roof I heard he’s fuckin’ with S. Dot!

[Chorus]

They call him Ryu, he’s sick
And he’s spitting fire
And mike got him out the dryer he’s hot
Found him in Fort Minor with Tak
What a fuckin’ nihilist porcupine
He’s a prick, he’s a cock
The type women want to be with, and rappers hope he get shot
Eight years in the making, patiently waiting to blow
Now the record with Shinoda’s taking over the globe
He’s got a partner in crime, his shit is equally dope
You won’t believe the kind of shit that comes out of this kid’s throat

Tak! – He’s not your everyday on the block
He knows how to work with what he’s got
Making his way to the top
He often gets a comment on his name
People keep asking him was it given at birth
Or does it stand for an acronym?
No he’s living proof, got him rocking the booth
He’ll get you buzzing quicker than a shot of vodka with juice
Him and his crew are known around as one of the best
Dedicated to what they do and give a hundred percent

Forget Mike – Nobody really knows how or why he works so hard
It seems like he’s never got time
Because he writes every note and he writes every line
And I’ve seen him at work when that light goes on in his mind
It’s like a design is written in his head every time
Before he even touches a key or speaks in a rhyme
And those motherfuckers he runs with,
The kids that he signed?
Ridiculous, without even trying,
How did he do it?!

[Chorus – repeat 2x]

[Outro – Mike Shinoda:]
Yeah! Fort Minor
M. Shinoda – Styles of Beyond
Ryu! Takbir! Machine Shop!

credit:https://www.azlyrics.com/lyrics/fortminor/rememberthename.html

Youtube Auto for android auto

  1. download android auto    https://www.apkmirror.com/apk/google-inc/android-auto/android-auto-2-8-5745-release/android-auto-maps-media-messaging-voice-2-8-574513-release-android-apk-download/
  2. Youtube  Auto http://www.thekirankumar.com/blog/2017/12/29/play-youtube-video-android-auto-app/

ESP32 MircoPython Install

https://www.python.org/downloads/

download ตัว python-2.7.14 ที่ https://www.python.org/ftp/python/2.7.14/python-2.7.14.msi

ติดตั้ง

โปรแกรมจะสร้าง folder ที่ c:\python27

cmd ออก command prompt

พิมพ์ cd\python27  แล้ว Enter

cd Scripts

pip install esptool    //ติดตั้ง esptool

pip install adafruit-ampy

esptool.py –port COM3 flash_id   //ตรวจสอบ การเชื่อมต่อ

esptool.py –port COM3 erase_flash //ลบ flash ของเดิมออก รอติดตั้ง micropython

สลับไป เปิดเวป https://www.micropython.org/downloads/#esp32

download firmware http://micropython.org/resources/firmware/esp32-20171224-v1.9.3-217-g5de064fb.bin

เมื่อได้ไฟล์ esp32-20171224-v1.9.3-217-g5de064fb.bin มาแล้ว

copy ไปไว้ใน c:\python27 แล้ว rename เป็น esp.bin

กลับไปที่ cmd พิมพ์

esptool.py –chip esp32 –port COM3 write_flash -z 0x1000 c:\python27\esp.bin  เพื่อ upload firmware ใส่ใน esp32

เห็นหน้าตาคล้ายจอแสดงผล ในตอน compile esp32 มากเลย

หลังจาก flash สำเร็จ ลองติดต่อโดยใช้ putty

เลือก Serial COM3 115200

เท่านี้ก็เรียบโร้ย

อ้อ ลืมตัว editor


download มาแล้วใส่ใน C:\Program Files\ESPlorer

ส่ง shortcut ESPlorer.bat มาบนจอ เท่านี้ก้ใช้ได้


ที่มา:https://www.youtube.com/watch?v=ay2yuGId7Ag


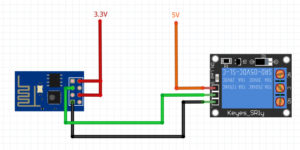
ESP8266 ESP-01 Blynk Virtual port Relay

esp-01-relay

/**************************************************************
* Blynk is a platform with iOS and Android apps to control
* Arduino, Raspberry Pi and the likes over the Internet.
* You can easily build graphic interfaces for all your
* projects by simply dragging and dropping widgets.
*
* Downloads, docs, tutorials: http://www.blynk.cc
* Sketch generator: http://examples.blynk.cc
* Blynk community: http://community.blynk.cc
* Social networks: http://www.fb.com/blynkapp
* http://twitter.com/blynk_app
*
* Blynk library is licensed under MIT license
* This example code is in public domain.
*
**************************************************************
* This example runs directly on ESP8266 chip.
*
* Note: This requires ESP8266 support package:
* https://github.com/esp8266/Arduino
*
* Please be sure to select the right ESP8266 module
* in the Tools -> Board menu!
*
* Change WiFi ssid, pass, and Blynk auth token to run 🙂
*
**************************************************************/

#define BLYNK_PRINT Serial // Comment this out to disable prints and save space
#include <ESP8266WiFi.h>
#include <BlynkSimpleEsp8266.h>

// You should get Auth Token in the Blynk App.
// Go to the Project Settings (nut icon).
char auth[] = “xxxxxxxxxxxxxxxxxxxxxxxxxx”;

// Your WiFi credentials.
// Set password to “” for open networks.
char ssid[] = “yyyyyyyyyyyyyyy”;
char pass[] = “zzzzzzzzzz”;

void setup()
{
Serial.begin(9600);
pinMode(0, OUTPUT);
pinMode(2, OUTPUT);
Blynk.begin(auth, ssid, pass);
}
BLYNK_WRITE(V1)
{
int i=param.asInt();
if (i==1)
{
delay(300);
digitalWrite(0, HIGH);
digitalWrite(2, HIGH);
delay(1750); // delay 1000 = 1 sec
digitalWrite(0, LOW);
digitalWrite(2, LOW);
}
else
{
digitalWrite(0, LOW);
digitalWrite(2, LOW);
}
}

void loop()
{
Blynk.run();
}


credit:http://docs.blynk.cc/#blynk-main-operations-get-data-from-hardware

https://community.blynk.cc/t/blynk-virtual-pin-blynk-write/7001/3

ESP8266 ESP-01 Relay Blynk #1

esp-01-relay

/**************************************************************
* Blynk is a platform with iOS and Android apps to control
* Arduino, Raspberry Pi and the likes over the Internet.
* You can easily build graphic interfaces for all your
* projects by simply dragging and dropping widgets.
*
* Downloads, docs, tutorials: http://www.blynk.cc
* Sketch generator: http://examples.blynk.cc
* Blynk community: http://community.blynk.cc
* Social networks: http://www.fb.com/blynkapp
* http://twitter.com/blynk_app
*
* Blynk library is licensed under MIT license
* This example code is in public domain.
*
**************************************************************
* This example runs directly on ESP8266 chip.
*
* Note: This requires ESP8266 support package:
* https://github.com/esp8266/Arduino
*
* Please be sure to select the right ESP8266 module
* in the Tools -> Board menu!
*
* Change WiFi ssid, pass, and Blynk auth token to run 🙂
*
**************************************************************/

#define BLYNK_PRINT Serial // Comment this out to disable prints and save space
#include <ESP8266WiFi.h>
#include <BlynkSimpleEsp8266.h>

// You should get Auth Token in the Blynk App.
// Go to the Project Settings (nut icon).
char auth[] = “xxxxxxxxxxxxxxxxxxxxxxxxxxxx”;

// Your WiFi credentials.
// Set password to “” for open networks.
char ssid[] = “yyyyyyy”;
char pass[] = “zzzzzzzzz”;

void setup()
{
Serial.begin(9600);
Blynk.begin(auth, ssid, pass);
}

void loop()
{
Blynk.run();
}