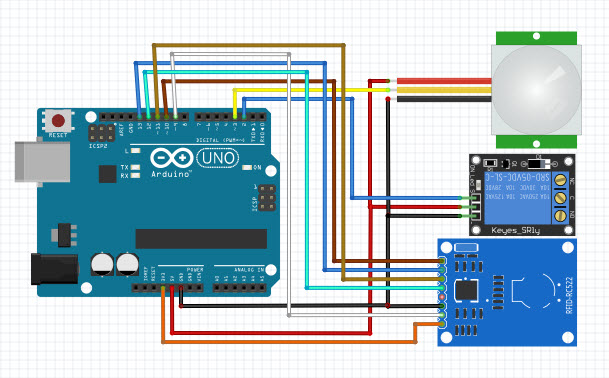
Arduino + PIR + RFID + Relay

arduino-rfid_rc522-pir_hc-sr501-1ch_relay

อุปกรณ์

  • Arduino UNO R3 SMD
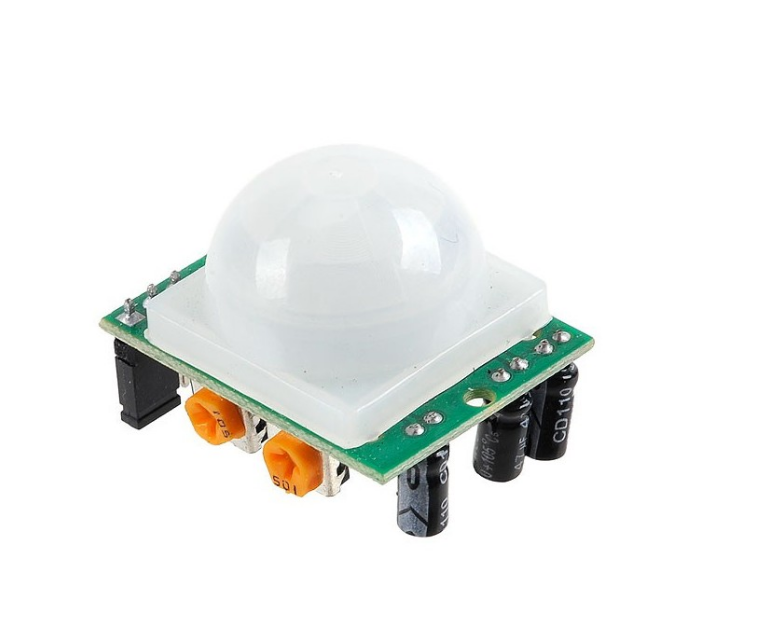
  • PIR Pyroelectric Infrared PIR Motion Sensor HC-SR501
  • RFID 13.56 MHz RC522 และ Tag
  • 1 Ch Relay 5V

การทำงาน  อ่านความเคลื่อนไหวจาก PIR แล้ว มาอ่านค่า Tag จาก RFID  หาก ตรงกัน ให้ Relay ทำงาน

ถ้าเอา tag ผ่าน RFID โดยไม่มีการเคลื่อนไหว จะไม่ทำงาน

ระยะ PIR


#include <SPI.h>
#include <RFID.h>
// ส่วนของ rfid
#define SS_PIN 10
#define RST_PIN 9
RFID rfid(SS_PIN,RST_PIN);
int serNum[5];
int cards[][5] = {
{22,227,22,203,40}
};
bool access = false;

int ledPin1= 7;
int rfidPPin1= 6;
int inputPin= 3;
int relay=2;
void setup(){
Serial.begin(9600);
pinMode(ledPin1, OUTPUT);
pinMode(inputPin, INPUT);
pinMode(relay, OUTPUT);
SPI.begin();
rfid.init();
}

void loop(){
int value= digitalRead(inputPin);

if (value == HIGH)
{
digitalWrite(ledPin1, HIGH);
Serial.println(” LED ON”);

//delay(100) ;
}else
{
digitalWrite(ledPin1, LOW);
Serial.println(” LED OFF”);
}
// rfid.isCard();
//
// while(digitalRead(7) == HIGH) ****** I try to use with while and if but the loop continue to run without the input signal condition even when the input wire is disconnected.

if(rfid.isCard()&& (value == HIGH)){
// if(rfid.isCard()){

if(rfid.readCardSerial()){
Serial.print(rfid.serNum[0]);
Serial.print(” “);
Serial.print(rfid.serNum[1]);
Serial.print(” “);
Serial.print(rfid.serNum[2]);
Serial.print(” “);
Serial.print(rfid.serNum[3]);
Serial.print(” “);
Serial.print(rfid.serNum[4]);
Serial.println(“”);

for(int x = 0; x < sizeof(cards); x++) {
for(int i = 0; i < sizeof(rfid.serNum); i++ ) {
if(rfid.serNum[i] != cards[x][i]) {
access = false;
break;
} else {
access = true;
}
}
if(access) break;
}

}

if(access);
Serial.println(“Get In—>”);
// while(digitalRead(7) == HIGH);
digitalWrite(relay, HIGH);
delay(500);
}else {
Serial.println(“You Blocked(-)”);
digitalWrite(relay, LOW);
delay(100);
}

rfid.halt();
}

ที่มา : http://forum.arduino.cc/index.php?topic=407081.0  แก้ไขโดย PualS

Arduino Uno + PIR Sensor

hc-sr501-labelled-althc-sr501

PIR Motion Sensor Module (HC-SR501)

จำนวน 1 ตัว

ตรวจจับความเคลื่อนไหว
Color: White + Green
Dimension: 3.2cm x 2.4cm x 1.8cm (approx)
Infrared sensor with control circuit board
The sensitivity and holding time can be adjusted
Working Voltage Range: DC 4.5V- 20V
Current drain:<60uA
Voltage Output: High/Low level signal:3.3V TTL output
Detection distance: 3–7M(can be adjusted)
Detection range: <140°
Delay time: 5-200S(can be adjusted, default 5s +-3%)
Blockade time: 2.5 S (default)
Trigger: L: Non-repeatable trigger H: Repeat Trigger (default)
Work temperature:-20-+80°C
Trigger Method: L unrepeatable trigger / H repeatable trigger

arduino-pir


int ledPin= 13;
int inputPin= 3;

void setup(){
pinMode(ledPin, OUTPUT);
pinMode(inputPin, INPUT);
}

void loop(){
int value= digitalRead(inputPin);

if (value == HIGH)
{
digitalWrite(ledPin, HIGH);
delay(1000) ;
}

else
{
digitalWrite(ledPin, LOW);
}
}


ที่มา:https://www.arduinoall.com/product/29/pir-hc-sr501-%E0%B9%80%E0%B8%8B%E0%B8%99%E0%B9%80%E0%B8%8B%E0%B8%AD%E0%B8%A3%E0%B9%8C%E0%B8%95%E0%B8%A3%E0%B8%A7%E0%B8%88%E0%B8%88%E0%B8%B1%E0%B8%9A%E0%B8%84%E0%B8%A7%E0%B8%B2%E0%B8%A1%E0%B9%80%E0%B8%84%E0%B8%A5%E0%B8%B7%E0%B9%88%E0%B8%AD%E0%B8%99%E0%B9%84%E0%B8%AB%E0%B8%A7-motion-sensor-module-hc-sr501

esp8266 Deep Sleep Max

esp8266 Deep sleep โดยต่อ ขา GPIO16 (D0) ไปขา Reset

node.dsleep(15 * 60 * 1000000)

โดย 1,000,000 ไมโครวินาที (microseconds) = 1 วินาที (second) โดยตัวอย่างจะ deep sleep ได้ 15 นาที

การตั้งค่า  โดยทฤษฎี จะสามารถทำ deep sleep ได้  4,294,967,295, which is about 71 minutes แต่

เนื่องจากข้อจำกัด จะทำได้แค่ 35 นาที (2,100,000 milliseconds)

ESP8266/NodeMCU Deep Sleep

dsleep() function accepts microseconds as its parameter (1,000,000 microseconds = 1 second), and the multiplication performed inline here is just to make it clearer that we’re sleeping for 15 minutes total. With the current 1.5.1 SDK, the maximum value accepted is 4,294,967,295, which is about 71 minutes. Earlier SDK versions had a lower limit, closer to 35 minutes. One common way to extend this is to maintain a counter in NVM (i.e., Flash or RTC Memory), and increment the counter each time that the device wakes up. If it reaches a certain threshold, then do the work, otherwise go back to sleep.

node.dsleep(15 * 60 * 1000000)

In this case, you don’t need to connect GPIO16 to the RESET pin, and you don’t need to specify an alarm value when calling dsleep(). Or, rather, use a value of zero to specify that the ESP should sleep forever (until reset, that is):

node.dsleep(0)
1
node.dsleep(0)
This permits very long idle periods (hours, days, or weeks possible) so long as you have a reliable method of waking the device up by triggering the RESET pin.

ที่มาhttps://blog.falafel.com/esp8266nodemcu-deep-sleep/

Deep Sleep for the ESP8266 ESP-01

Because the ESP-01 does not have the necessary pin exposed for Deep Sleep (GPIO 16) we will need to do some surgical soldering on it.
We need to solder a very thin piece of wire from the reset pin to one of those very small pads on the esp chip.

Don’t worry, it’s a lot easier than it looks.

Get the piece of wire, solder it on the reset pin, tin the other end and bend it into position
What I did next is applying head somewhere near the end of the wire, this melted the solder on the wire and on the pad and I got a connection. Easy peasy.

You will also need to remove at least the red LED to lower consumption.

I have also added some hot glue on top of the wire, it’s quite easy to pull it away together with the esp’s pad otherwise.

ในขั้นตอน จะมีฟังก์ชั่นการทำงานดังนี้

– try to connect to wifi, if fail start in config mode
– read dht22 data
– post dht22 data to cloud

– go to sleep
– awake and repeat


ที่มาhttps://tzapu.com/minimalist-battery-powered-esp8266-wifi-temperature-logger/


วัดอุณหภูมิ ความชื้น ขึ้น LINE NOTIFY

void Line_Notify(String message);

#include <ESP8266WiFi.h>
#include <DHT.h>

#define DHTPIN D2

// Existing WiFi network
const char* ssid = “xxxxx”; // your wifi name
const char* password = “xxxxx”; // your wifi password

#define LINE_TOKEN “xxxxxxxxxxxxxxx” // LINE Notify token

#define DHTTYPE DHT11 // DHT 11
//#define DHTTYPE DHT22 // DHT 22 (AM2302)
//#define DHTTYPE DHT21 // DHT 21 (AM2301)

DHT dht(DHTPIN, DHTTYPE);

void setup() {
Serial.begin(9600);
Serial.println(“Weather station by kittipongint!”);

dht.begin();

// Connect to your WiFi network
WiFi.begin(ssid, password);
Serial.print(“Connecting”);

// Wait for successful connection
while (WiFi.status() != WL_CONNECTED) {
delay(500);
Serial.print(“.”);
}
Serial.println(“”);
Serial.print(“Connected to: “);
Serial.println(ssid);
Serial.print(“IP address: “);
Serial.println(WiFi.localIP());
Serial.println(“”);
}
void read_sensor() {
delay(600000);

// Reading temperature or humidity takes about 250 milliseconds!
// Sensor readings may also be up to 2 seconds ‘old’ (its a very slow sensor)
float h = dht.readHumidity();
// Read temperature as Celsius (the default)
float t = dht.readTemperature();
// Read temperature as Fahrenheit (isFahrenheit = true)
float f = dht.readTemperature(true);

// Check if any reads failed and exit early (to try again).
if (isnan(h) || isnan(t) || isnan(f)) {
Serial.println(“Failed to read from DHT sensor!”);
return;
}

// Compute heat index in Fahrenheit (the default)
float hif = dht.computeHeatIndex(f, h);
// Compute heat index in Celsius (isFahreheit = false)
float hic = dht.computeHeatIndex(t, h, false);

Serial.print(“Humidity: “);
Serial.print(h);
Serial.print(” %\t”);
Serial.print(“Temperature: “);
Serial.print(t);
Serial.print(” *C “);
Serial.print(f);
Serial.print(” *F\t”);
Serial.print(“Heat index: “);
Serial.print(hic);
Serial.print(” *C “);
Serial.print(hif);
Serial.println(” *F”);

String message = “%E0%B8%AD%E0%B8%B8%E0%B8%93%E0%B8%AB%E0%B8%A0%E0%B8%B9%E0%B8%A1%E0%B8%B4%20”;
// Send notificatin with LINE Notify
Line_Notify(message + t + “%C2%B0C”);
}

void loop() {
read_sensor();
}
void Line_Notify(String message) {
WiFiClientSecure client;

if (!client.connect(“notify-api.line.me”, 443)) {
Serial.println(“connection failed”);
return;
}

String req = “”;
req += “POST /api/notify HTTP/1.1\r\n”;
req += “Host: notify-api.line.me\r\n”;
req += “Authorization: Bearer ” + String(LINE_TOKEN) + “\r\n”;
req += “Cache-Control: no-cache\r\n”;
req += “User-Agent: ESP8266\r\n”;
req += “Content-Type: application/x-www-form-urlencoded\r\n”;
req += “Content-Length: ” + String(String(“message=” + message).length()) + “\r\n”;
req += “\r\n”;
req += “message=” + message;

client.print(req);

delay(30);

// Serial.println(“—–“);
while(client.connected()) {
String line = client.readStringUntil(‘\n’);
if (line == “\r”) {
break;
}
//Serial.println(line);
}
// Serial.println(“—–“);
}


ที่มา:https://kittipongint.com/weather-station-wemos-d1-mini/

Arduino Uno R3 + DHT22 + LCD 16×2

เพิ่งหัดเล่น ทดลองเล่น Arduino ดู  ฝึกสมอง เจอเวปให้ลอง เล่นไปเรื่อยๆ  เจอเวปลอง วัด อุณหภูมิ ความชื้น ออกจอ LCD ดูรูปก็ง่าย แต่ต่อตาม มีผิด (แล้วทำไมมันไม่แก้ฟะ) แถมปรากฎว่า โปรแกรมตัวอย่างที่ให้ ผิดอีก หรือเราโง่ก็ไม่รู้

จึงลอง งมแก้ code ใหม่ ให้ใช้งานได้ตรงจุดประสงค์

Arduino DHT22 LCD Temp humidity

ดังนี้

#include <DHT.h>
#include <LiquidCrystal.h>

// Pin connected to the sensor data pin
#define DHTPIN 7

// Display pins
LiquidCrystal lcd(12,11,5,4,3,2);

// Use the line according to the sensor model
// #define DHTTYPE DHT11 // Sensor DHT11
#define DHTTYPE DHT22 //DHT Sensor 22 (AM2302)
// #define DHTTYPE DHT21 // DHT Sensor 21 (AM2301)

// Definitions sensor: pin, type
DHT dht (DHTPIN, DHTTYPE);

// Array symbol degree
byte degree [8] =
{
B00001100,
B00010010,
B00010010,
B00001100,
B00000000,
B00000000,
B00000000,
B00000000,
};

void setup() {
// put your setup code here, to run once:
// Initialize the display
lcd.begin (16,2);
lcd.clear ();
// Create the custom character with the symbol of the degree
lcd.createChar (0,degree);
// Information on the initial display
lcd.setCursor (0,0);
lcd.print (“Temp. : “);
lcd.setCursor (13,0);
// Shows the symbol of the degree
lcd.write (byte (0));
lcd.print (“C”);
lcd.setCursor (0,1);
lcd.print (“Umid. : “);
lcd.setCursor (14,1);
lcd.print (“%”);

Serial.begin (9600);
Serial.println (“Waiting for data …”);
// Starts DHT sensor
dht.begin ();
}

void loop()
{
// put your main code here, to run repeatedly:
// Wait 2 seconds between the measurements
delay (2000);

// Moisture reading
float h = dht.readHumidity();
float t = dht.readTemperature();

// dht.readHumidity float h = ();
// Reading of temperature (Celsius)
// t = dht.readTemperature float ();

// Check if the sensor is responding
if (isnan (h) || isnan (t))
{
Serial.println (“Failed to read DHT sensor data !!!”);
return;
}

// Display the temperature in the serial monitor and display
Serial.print (“Temperature: “);
Serial.print (t);
lcd.setCursor(8,0);
lcd.print (t);
Serial.print (” C * “);
// Show the moisture in the serial monitor and display
Serial.print (“humidity: “);
Serial.print (h);
Serial.println (” %”);
lcd.setCursor (8,1);
lcd.print (h);
}


image

Credit:http://www.boxelectronica.com/en/temperature-humidity/146-humidity-and-temperature-dht22.html