// www.arduinesp.com
//
// Plot DTH11 data on thingspeak.com using an ESP8266
// April 11 2015
// Author: Jeroen Beemster
// Website: www.arduinesp.com
// ใช้กับ กล่อง วัดอุณหภูมิที่บ้าน
// 20-3-2017 ใช้งานครั้งแรก DHT22
// 19-5-2017 เพิ่ม DS18B20
// 18-12-2017 ซ่อมครั้งที่ 1 เปลี่ยน DHT22 เป็น AM2305
#include <DHT.h>
#include <ESP8266WiFi.h>
#include <OneWire.h>
#include <DallasTemperature.h>
// replace with your channel’s thingspeak API key,
String apiKey = “WXXXXXXXXX”;
const char* ssid = “AP_xxxx”;
const char* password = “1xxxxxxxx”;
const char* server = “api.thingspeak.com”;
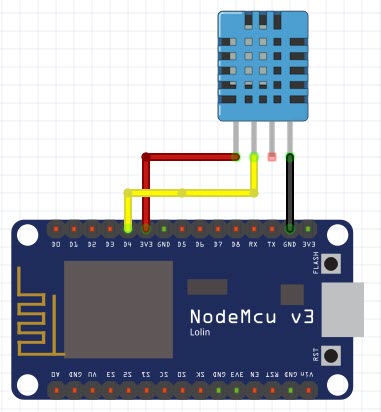
#define DHTPIN1 D1 // d0 dht22 ext
// #define DHTPIN2 D2 // d1 dht22 mushroom
DHT dht1(DHTPIN1,DHT22,15);
// DHT dht2(DHTPIN2,DHT22,15);
#define sensorPin D2 // Data wire is plugged into pin D3 on NodeMCU
OneWire oneWire(sensorPin); // Setup the oneWire Sensor
DallasTemperature DS18B20(&oneWire); // Pass reference to Dallas Temperature.
WiFiClient client;
ADC_MODE(ADC_VCC);
// int vcc;
void setup() {
Serial.begin(115200);
delay(10);
dht1.begin();
//dht2.begin();
WiFi.begin(ssid, password);
Serial.println();
Serial.println();
Serial.print(“Connecting to “);
Serial.println(ssid);
WiFi.begin(ssid, password);
while (WiFi.status() != WL_CONNECTED) {
delay(500);
Serial.print(“.”);
}
Serial.println(“”);
Serial.println(“WiFi connected”);
}
void loop() {
float h1 = dht1.readHumidity();
float t1 = dht1.readTemperature();
float vcc = 0.00f;
vcc = ESP.getVcc()/1024.00f;
// uint32_t vcc = ESP.getVcc()/1000.0;
DS18B20.requestTemperatures();
float t2 = DS18B20.getTempCByIndex(0);
//float h2 = 0; // can’t read ds18b20 humidity
//float h2 = dht2.readHumidity();
//float t2 = dht2.readTemperature();
//if (isnan(h1) || isnan(t1) ||isnan(h2) || isnan(t2)) {
if (isnan(h1) || isnan(t1) ) {
Serial.println(“Failed to read from EXT DHT sensor 1 !”);
//return;
t1=0;
h1=0;
}
else if (isnan(t2) ) {
Serial.println(“Failed to read from DS18B20 mushroom sensor 2 !”);
//return;
t2=0;
//h2=0;
}
if (client.connect(server,80)) { // “184.106.153.149” or api.thingspeak.com
String postStr = apiKey;
postStr +=”&field1=”;
postStr += String(t1);
postStr +=”&field2=”;
postStr += String(h1);
postStr +=”&field3=”;
postStr += String(vcc);
postStr +=”&field4=”;
postStr += String(t2);
//postStr +=”&field5=”;
//postStr += String(h2);
postStr += “\r\n\r\n”;
client.print(“POST /update HTTP/1.1\n”);
client.print(“Host: api.thingspeak.com\n”);
client.print(“Connection: close\n”);
client.print(“X-THINGSPEAKAPIKEY: “+apiKey+”\n”);
client.print(“Content-Type: application/x-www-form-urlencoded\n”);
client.print(“Content-Length: “);
client.print(postStr.length());
client.print(“\n\n”);
client.print(postStr);
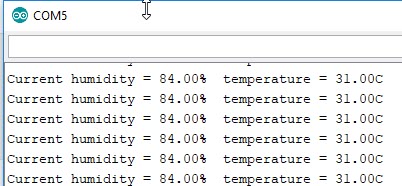
Serial.print(“Temperature 1: “);
Serial.print(t1);
Serial.print(” C Humidity 1: “);
Serial.print(h1);
Serial.print(” % Voltage : “);
Serial.print(vcc);
Serial.print(” V MushRoom Temperature 2: “);
Serial.print(t2);
Serial.println(” C”);
//Serial.print(” C MushRoom Humidity 2: “);
//Serial.print(h2);
//Serial.println(“% send to Thingspeak”);
}
client.stop();
Serial.println(“Waiting”);
// thingspeak needs minimum 15 sec delay between updates
// delay 1 minitue delay 1000=1sec
Serial.println(“Wifi Disconnect”);
WiFi.disconnect();
//delay(60000);
delay(100);
//โดย 1,000,000 microseconds = 1 second)
//node.dsleep(60 * 1000000)
Serial.println(“”);
Serial.println(“Deep Sleep 5 min”);
// deep sleep 1 min
//ESP.deepSleep(60 * 1000000, WAKE_RF_DEFAULT);
//deep sleep 5 min
ESP.deepSleep(360 * 1000000, WAKE_RF_DEFAULT);
//ESP.deepSleep(5*60 * 1000000);
//node.dsleep(60 * 1000000);
delay(500); // wait for deep sleep to happen
}