QuasarARM การกลับมาแก้ตัวอีกครั้ง #5
วันนี้พอมีเวลา ก็ทำการทดลองการ upload Firmware โดย Download มาจาก https://fandy.ucoz.org/publ/metalloiskatel_quot_kvazar_quot_quot_quasar_quot/metalloiskatel_quot_quasar_arm_quot/2-1-0-5 โดยใช้ Download Firmware รุ่น 2.6.3M
ส่วนอุปกรณ์การอัพโหลด ได้ซื้อ FT232 USB to TTL UART มาไว้นานแล้ว และใช้ซอฟต์แวร์ upload ของ STMicroelectronics คือ STM32 Flash loader demonstrator (FLASHER-STM32)
https://www.st.com/en/development-tools/flasher-stm32.html
ความเข้าใจเดิมคือต้องupload ผ่าน ST-Link V2 ผ่านทาง Single wire interface module (SWIM) ผ่านทางขา NRST SWDCLK SWDIO GND VCC แต่ดูตัวอย่างจากเว็บ youtube ที่มีคนอัพโหลดเฟิร์มแวร์ที่ QuasarARM อุปกรณ์ที่สำเร็จมาแล้ว ก็ผ่าน TTL UART
 ในการ Upload ครั้งนี้ ใช้
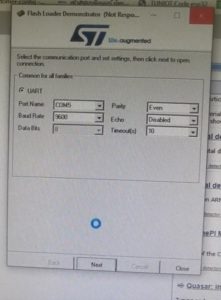 กด Next ถ้าระบบเชื่อมกัน จะผ่านไปเมนูถัดไป พอกดปุ่ม โปรแกรมค้างทันที
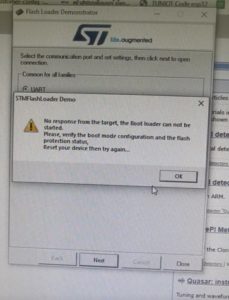 แล้วขึ้น ข้อความ
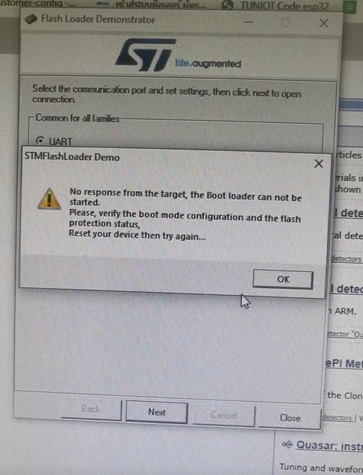
No response from the target,the Boot loader can not be started.
Please, verify the boot mode configuration and the flash protection status,
Reset your device then try again…
ข้อความนี้เห็นมาเยอะมากแล้วใน board เดิม แสดงว่า อุปกรณ์ไม่เชื่อมกัน cpu ไม่ทำงาน ไม่ได้ตั้ง boot mode แต่นี่เป็น board ใหม่
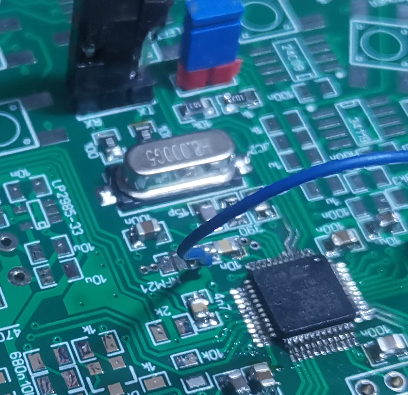
มีคนทำสำเร็จ YouTube แสดงว่า ต้องมีอะไรผิดพลาด ต้องตรวจสอบอีกครั้ง พบว่า ไม่ได้ต่อไฟ 3.3V อีกจุด จาก IC LP2985-33 เนื่องจาก สั่งของแล้วยังไม่มา จึงต่อสายไฟ เชื่อม 3.3V มาเข้าอีกจุด
คราวนี้ลองย้อนการทำงานใหม่
พอกด Next จอก็ขึ้น
แล้วขึ้น ข้อความ
No response from the target,the Boot loader can not be started.
Please, verify the boot mode configuration and the flash protection status,
Reset your device then try again…
ข้อความนี้เห็นมาเยอะมากแล้วใน board เดิม แสดงว่า อุปกรณ์ไม่เชื่อมกัน cpu ไม่ทำงาน ไม่ได้ตั้ง boot mode แต่นี่เป็น board ใหม่
มีคนทำสำเร็จ YouTube แสดงว่า ต้องมีอะไรผิดพลาด ต้องตรวจสอบอีกครั้ง พบว่า ไม่ได้ต่อไฟ 3.3V อีกจุด จาก IC LP2985-33 เนื่องจาก สั่งของแล้วยังไม่มา จึงต่อสายไฟ เชื่อม 3.3V มาเข้าอีกจุด
คราวนี้ลองย้อนการทำงานใหม่
พอกด Next จอก็ขึ้น
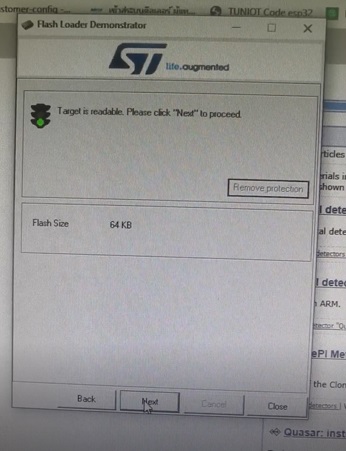
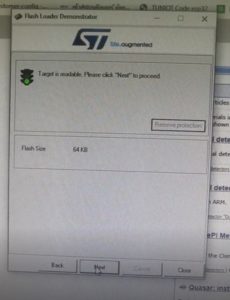 ยูเรก้า ผ่านแล้ว เท่าที่ดูใน youtube มาจุดนี้นี่สำเร็จไปค่อนนึงแล้ว กด Next
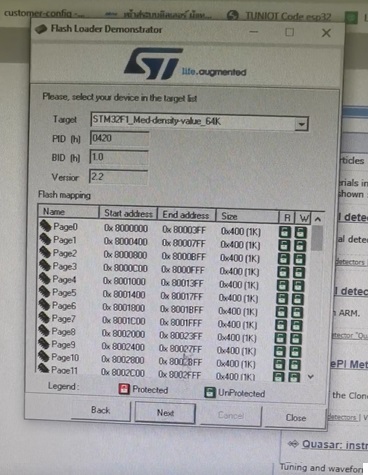
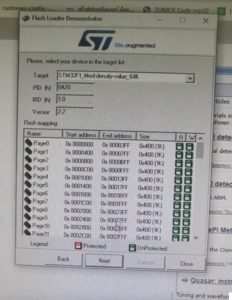 จากนั้นกด Next
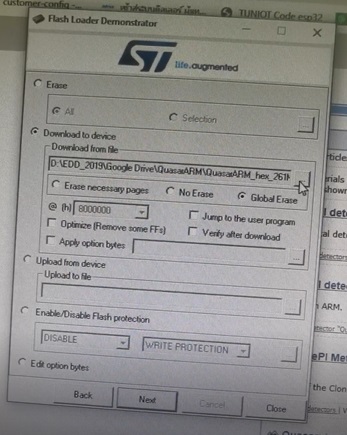
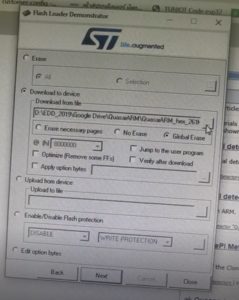 ใส่ชื่อไฟล์ ที่upload ลงไป ผมใช้ QuasarARM_261M.hex จากนั้นกด Next ขั้นตอน load ไปเรื่อยๆ
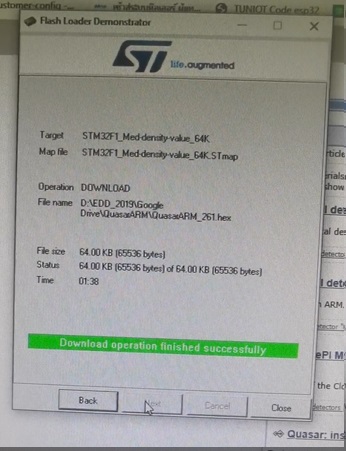
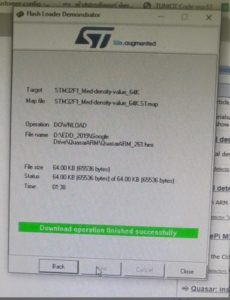 จน upload เสร็จ ยูเรกา อีกครั้ง
 ในการ Upload ครั้งนี้ ใช้
- ไฟ VCC 3.3V ของ UART บัดกรีขั้วมาลงบอร์ด
- GND จาก UART กับ GND ของ board
- เชื่อม TX ฝั่ง UART เข้ากับ RX ของ board
- RX ฝั่ง UART เข้ากับ TX ของ board
 กด Next ถ้าระบบเชื่อมกัน จะผ่านไปเมนูถัดไป พอกดปุ่ม โปรแกรมค้างทันที
 แล้วขึ้น ข้อความ
No response from the target,the Boot loader can not be started.
Please, verify the boot mode configuration and the flash protection status,
Reset your device then try again…
ข้อความนี้เห็นมาเยอะมากแล้วใน board เดิม แสดงว่า อุปกรณ์ไม่เชื่อมกัน cpu ไม่ทำงาน ไม่ได้ตั้ง boot mode แต่นี่เป็น board ใหม่
มีคนทำสำเร็จ YouTube แสดงว่า ต้องมีอะไรผิดพลาด ต้องตรวจสอบอีกครั้ง พบว่า ไม่ได้ต่อไฟ 3.3V อีกจุด จาก IC LP2985-33 เนื่องจาก สั่งของแล้วยังไม่มา จึงต่อสายไฟ เชื่อม 3.3V มาเข้าอีกจุด
คราวนี้ลองย้อนการทำงานใหม่
พอกด Next จอก็ขึ้น
แล้วขึ้น ข้อความ
No response from the target,the Boot loader can not be started.
Please, verify the boot mode configuration and the flash protection status,
Reset your device then try again…
ข้อความนี้เห็นมาเยอะมากแล้วใน board เดิม แสดงว่า อุปกรณ์ไม่เชื่อมกัน cpu ไม่ทำงาน ไม่ได้ตั้ง boot mode แต่นี่เป็น board ใหม่
มีคนทำสำเร็จ YouTube แสดงว่า ต้องมีอะไรผิดพลาด ต้องตรวจสอบอีกครั้ง พบว่า ไม่ได้ต่อไฟ 3.3V อีกจุด จาก IC LP2985-33 เนื่องจาก สั่งของแล้วยังไม่มา จึงต่อสายไฟ เชื่อม 3.3V มาเข้าอีกจุด
คราวนี้ลองย้อนการทำงานใหม่
พอกด Next จอก็ขึ้น
 ยูเรก้า ผ่านแล้ว เท่าที่ดูใน youtube มาจุดนี้นี่สำเร็จไปค่อนนึงแล้ว กด Next
 จากนั้นกด Next
 ใส่ชื่อไฟล์ ที่upload ลงไป ผมใช้ QuasarARM_261M.hex จากนั้นกด Next ขั้นตอน load ไปเรื่อยๆ
 จน upload เสร็จ ยูเรกา อีกครั้ง

 +
+