Entries by อ.เอ้ด

Mikrotik Hotspot Login Logo Change

Mikrotik ตั้งแต่ รุ่น 6.47 ปรับปรุง login hotspot ใหม่ เป็นรูปแบบ SVG

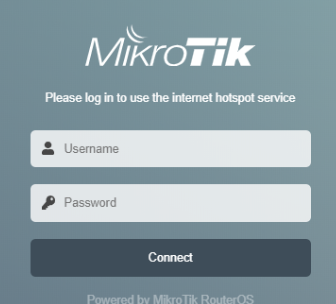
แก้ไข Login.html มองหา

				
					<svg class="logo" data-name="Layer 1" xmlns="http://www.w3.org/2000/svg" viewBox="0 0 174 42">
                        <path fill="#fff" d="M7.32 13.66L0 41.74 3.12 41.74 9.49 15.94 9.58 15.94 15.01 41.74 18.22 41.74 36.86 16.34 36.95 16.34 30.02 41.74 33.18 41.74 40.4 13.66 35.73 13.66 17.23 38.87 11.99 13.66 7.32 13.66zM43.43 21.45L38.19 41.74 41.16 41.74 46.4 21.45 43.43 21.45zM50.68 21.45L45.5 41.74 48.47 41.74 50.36 34.39 55.55 30.77 62.02 41.74 65.27 41.74 57.91 29.28 69.43 21.45 65.46 21.45 51.21 31.36 51.12 31.28 53.66 21.45 50.68 21.45z" />
                        <path d="M71.18 21.45L65.94 41.74h3l2.74-10.62c1-3.81 3.82-7.39 9.16-7.47.56 0 1.13 0 1.7 0l.66-2.48c-.52 0-1.09 0-1.61 0-4.34 0-6.94 2-8.82 5h-.1l1.23-4.68zM103.8 28.8c0-5-4-7.94-9.63-7.94-8.69 0-13.59 6.37-13.59 13 0 5.07 3.44 8.45 9.72 8.45 9 0 13.5-6.68 13.5-13.53m-3 .52c0 4.72-3.44 10.93-9.95 10.93-5 0-7.32-2.68-7.32-6.61 0-4.76 3.59-10.7 10.1-10.7 4.77 0 7.17 2.6 7.17 6.38M132.33 21.43L134.26 13.66 105.19 13.66 103.27 21.45 112.59 21.45 112.59 21.45 122.99 21.45 122.99 21.45 132.33 21.43zM111.67 25.17L107.55 41.74 117.93 41.74 122.06 25.17 122.06 25.16 111.67 25.16 111.67 25.17zM134 25.17l-4.11 16.57h9.35l4.1-16.57zm10.28-3.73l1.94-7.78h-9.34l-2 7.79zM150.09 13.66L143.11 41.74 152.45 41.74 153.91 35.92 156.04 34.34 159.34 41.74 169.49 41.74 163.26 29.55 174.26 21.33 163.07 21.33 156.18 27.3 156.09 27.3 159.44 13.66 150.09 13.66zM47.45 0c1.14 7.93 5.39 12.74 14.07 13.14A10.69 10.69 0 0 1 47.45 0" fill="#fff" fill-rule="evenodd" />
                        <path d="M42.91,1.4c.1,0,.11,0,.12.11A16.55,16.55,0,0,0,48.26,13a16.6,16.6,0,0,0,12,4.66c-10,4-20.55-5.6-17.33-16.28" fill="#fff" fill-rule="evenodd" /></svg>


จากนั้นไปเวป https://editor.method.ac/

https://boxy-svg.com/app

สร้างรูปแก้ไขปรับปรุง แล้วเอามาใส่แทน เช่น

				
					<svg class="logo" data-name="Layer 1" xmlns="http://www.w3.org/2000/svg" viewBox="0 0 744.000000 246.000000" >
 <text transform="matrix(10.5683 0 0 15.5699 -190.632 -2500.72)" stroke="#000" font-weight="bold" xml:space="preserve" text-anchor="start" font-family="'Yrsa'" font-size="NaN" id="svg_8" y="171.85095" x="19.44624" stroke-width="0" fill="#0000ff">EDD EASY</text>
</svg>


ESPHOME ESP-01 Relay board

esphome:
  name: esp-01-relay-3

esp8266:
  board: esp01_1m

# Enable logging
logger:

# Enable Home Assistant API
api:

ota:
  password: “97e03zzzzzzzzzzzzzzzzzzzz”

wifi:
  ssid: Your SSID
  password: Your PAssword

  manual_ip:
    static_ip: 192.168.1.100
    gateway: 192.168.1.1
    subnet: 255.255.255.0
    dns1: 192.168.1.1
    dns2: 8.8.8.8
  # Enable fallback hotspot (captive portal) in case wifi connection fails
  ap:
    ssid: “Esp-01-Relay-3 Fallback Hotspot”
    password: “0fjsyyyyyy”

captive_portal:
switch:
  – platform: gpio
    pin: GPIO0
    name: “Relay Switch 10A”
   

ใช้งานLocal Home Assistant ร่วมกับ Google Home

  1. ติดตั้ง add-on ngrok และเริ่มต้นสร้าง tunnel เข้ามาที่ Home Assistant
  2. Integrate Google Home กับ Home Assistant
  3. ตั้งค่าให้อุปกรณ์ Google Home เชื่อมต่อกับ Home Assistant

ติดตั้ง add-on ngrok และเริ่มต้นสร้าง tunnel เข้ามาที่ Home Assistant

  • cofiiguration
  • Add-ons,Backups & Supervisor
  • ADD-ON STORE
  • มองหา ngtok Client  แล้ว Install 
  • หลังติดไปไปที่ www.ngrok.com เข้าไป sign-up ลงทะเบียน
  • จากนั้น login เข้าไป ดูที่ Getting Started
  • เลือก Your Authtoken
  • จะมี Token ให้ คัดลอกมา
  • กลับมาที่ ngrok Client เลือกเมนูบน  Configuration
  • ที่ Option ให้วางค่า token ที่ได้หน้า auth_token:

				
					log_level: info
auth_token: 27XXXXXXXXXXXXXXXXXXXXXXXXXXXXXXX
region: us
tunnels:
  - name: hass
    proto: http
    addr: 8123
    inspect: false
    bind_tls: true


  • จากนั้น SAVE และ RESTART
  • กด menu บน Info เลือก Open WEBUI
  • จะได้ค่า Tunnel URLs คัดลอกมา

2.Integrate Google Home กับ Home Assistant

ไปที่ https://console.actions.google.com/ สมัครใช้งาน 

จากนั้นไปกดสร้าง New Project ตั้งชื่อ

หลังจากตั้งชื่อ project แล้ว จะเข้า Get Started

เลือก Smart Home เลือก Start Building

เลือก Build your Action

กด Add Action(s) จะขึ้น

Build your first Action เลือก Get Started

เลือก Smart Home เลือก Build

ตรง Fulfillment URL

นำลิงค์ tunnel ที่ได้จาก ngrok บน home assistant มาใส่แล้วตามด้วย /api/google_assistant แล้วกด save

กดปุ่มจุด 3 จุดบนมุมขวาบนแล้วเลือก Project Setting

คัดลอก Project ID ไว้

ไปที่ Develop เลือก Account linking

เลือก No, I Only want to allow accoubnt creation on my website

ที่ Linking type เลือก OAuth

https://www.duckdns.org/
ลงทะเบียน
add subdomain ex. xxxxx.duckdns.org
Copy Token
Home Assistant
Settings -> Add-ons ->
ADD-ON STORE เลือก Duckdns -> INSTALL
Configuration
Domains
Token
Save
ไปที่ info กด Start
สมัคร Let’s Encrypt เพื่อ ทำ SSL
Settings -> Add-ons ->
ADD-ON STORE เลือก Let’s Encrypt-> INSTALL
เลือก Configuration
ใส่ Domains
E-mail
กด Save
กลับมาหน้า info
กด Start

แก้ไข configuration.yaml
เพิ่ม
# enable https
http:
ssl_certificate: /ssl/fullchain.pem
ssl_key: /ssl/privkey.pem

Disable Windows 10 Update Permant

Service Windows UpdateStop DisableRecovery ->Reset fail count after 0 days Restart service after 0 minutesBackground Intelligent Transfer ServiceStop DisableRecovery -> ไปที่ networkปิด metered connection regeditComputer\HKEY_LOCAL_MACHINE\SOFTWARE\Policies\MicrosoftNew Key: WindowsUpdateNew Key:AUNew Dword 32 bits :AUOptions :2 gpedit.msccom configadmin tempWindows CompomentsWindows Updates Configure Windows Update ->Disable task ScheduleMicrosoftWindowsWindowsUpdatesScheduled Start Disablesihpostreboot Disable

Autologin Windows 10

regeditComputer\HKEY_LOCAL_MACHINE\SOFTWARE\Microsoft\Windows NT\CurrentVersion\WinlogonAutoAdminLogonตั้งเป็น 1DefaultUserNameDefaultPassword ถ้าไม่มีสร้าง String Value

Win 10 Oct add share printer Error 0x0000011b

Windows 10 Update Oct KB5005565 and KB5005568
add share printer Error 0x0000011b
Disable Print Spooler RPC Encryption
HKEY_LOCAL_MACHINE\System\CurrentControlSet\Control\Print
add DWORD-32 bit RpcAuthnLevelPrivacyEnabled
Value 0

restart print spooler service